Working with Objects
Types of Objects
FirewallFabrik supports a variety of object types, both simple and complex. Simple object types include Address, Network, Host, and IP, TCP, UDP and ICMP service objects. More complex object types are Firewall, Address Table, DNS Name, and User Service.
There are the following types of objects in FirewallFabrik:
- Addressable objects: Section 5.2 describes objects that have, either directly or indirectly, an address of some kind. This category includes the physical objects (firewalls, hosts, interfaces) as well as some logical objects (networks, address ranges, individual addresses). Addressable objects can be grouped together into Object groups.
- Service objects: Section 5.3 describes objects that represent services. They include IP, TCP, UDP, and ICMP services, as well as user services. Service objects can be grouped together into Service groups.
- Time Interval objects: Described in Section 5.4, these represent a discreet or recurring period of time. They can be used as part of a rule in the firewall. For example, you could have a rule that matches on weekends, but not during the week.
- Rule set objects: Described in Section 5.2.4, these represent the various rule sets in a firewall. By default, a firewall starts with one access policy, one NAT, and one routing rule set, but you can add more of each. Rule set objects only exist as child objects of a firewall.
All objects in FirewallFabrik have some characteristics in common.
All objects have a Name field and a Comment field. The Name field can contain white spaces and can be arbitrarily long (though shorter names work better in the GUI). The Comment field can contain any text of any length.
Addressable Objects
This section describes object types that represent addresses or groups of addresses.
Common Properties of Addressable Objects
Objects that contain IP address fields provide validity checking for the address when the object is saved. If the IP address is invalid, the system notifies you with an error.
The Firewall Object
A firewall object represents a real firewall device in your network. This firewall object will have interface and IP address objects that mirror the real interfaces and IP addresses of the actual device. In addition, the firewall object is where you create the access policy rule sets, NAT rule sets, and routing rule sets that you assign to your firewall device.
By default, a firewall has one Policy rule set, one NAT rule set, and one routing rule set. However, you can create more than one rule set of each type for a firewall. On the other hand, you don't have to populate all the default rule sets. You can, for example, create a Policy rule set and leave the NAT and Routing rule sets empty. Section 7.1 explains more about policies and rule sets.
To speed up the creation of a firewall object, FirewallFabrik has a wizard that walks you through creating the object. The wizard has three options for creating a firewall object:
- From a template: FirewallFabrik comes with several pre-defined templates. You can use these to create a firewall that is close to your configuration, then modify it to fit your needs.
- Manually: You can provide interface IP address, subnet mask, gateway, and other parameters manually. You can add this information when you create the firewall, or you can add it later. Section 5.2.2.1 describes this process.
- Using SNMP: FirewallFabrik uses SNMP queries to learn about the network. Section 5.2.2.3 describes this process.
Creating a Firewall Object Manually
To start the firewall object creation wizard, right-click the Firewalls folder in the User tree and select New Firewall.
The first page of the wizard displays.
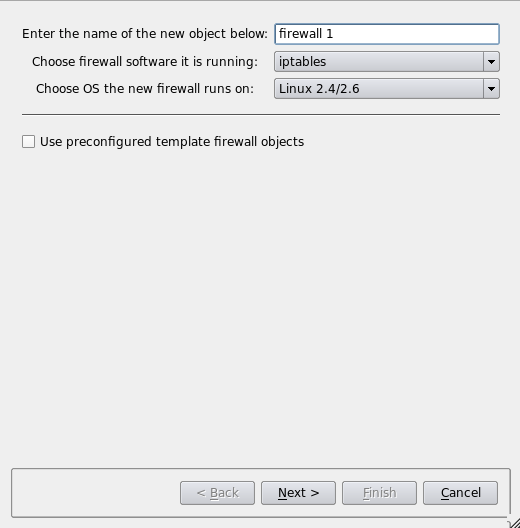
Give the firewall object a name. Usually, this name is the same name you assigned to the device, but it need not be if you're assigning interfaces manually. (If you are use SNMP or DNS to populate the interfaces, then the name must be the same as the device name.) Then specify the firewall software and device OS.
Leave the Use pre-configured template firewall objects checkbox unchecked.
Click Next.
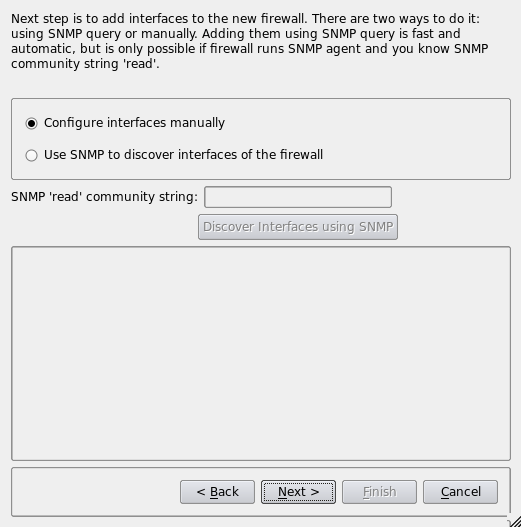
Select Configure interfaces manually and click Next.
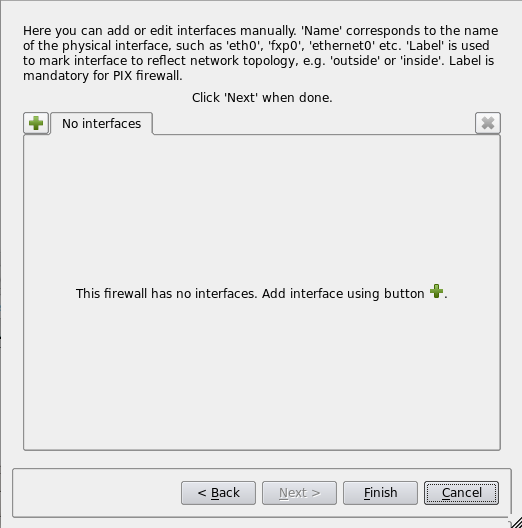
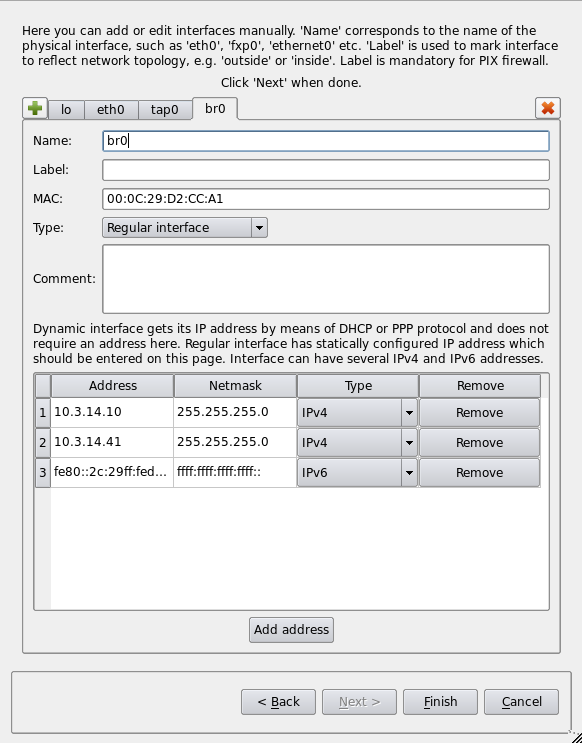
This is the page where you can add interfaces to the firewall. In this page of the dialog, each interface is represented by a tab in the tabbed widget. Use the "+" button in the upper left corner to add a new interface. The "x" button in the upper right corner deletes an interface. Click the "+" button to create first interface and give it the name "eth0":
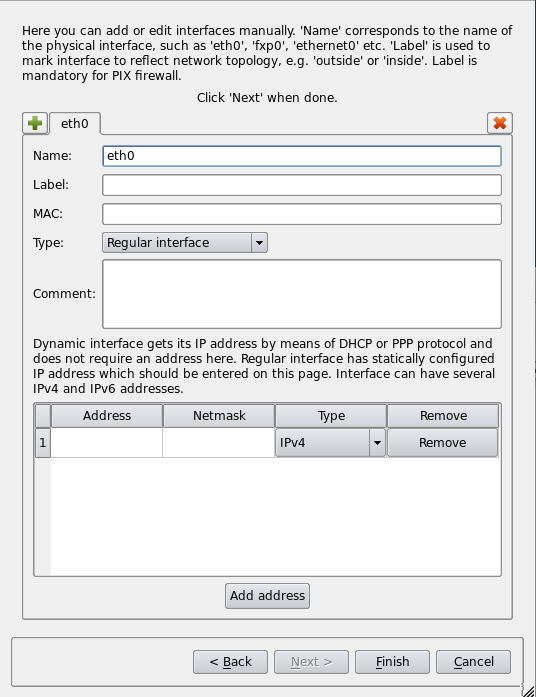
To add an IP address to the interface, click in the table cell in the "Address" column and begin typing the address. The cell becomes an editable field that lets you enter the address. Add the network mask using the table cell in the "Netmask" column. The "Type" drop-down list lets you choose between IPv4 and IPv6 addresses. The network mask field accepts both full numeric notation and bit length for IPv4 netmasks. For IPv6, only bit length is allowed. The "Remove" button removes the address. You can add several addresses to the same interface.
The following elements are available on this page of the wizard:
- Name: The name of the interface object in FirewallFabrik must match exactly the name of the interface of the firewall machine it represents. This will be something like "eth0", "eth1", "en0", "br0", and so on.
- Label: This field serves the purpose of a descriptive label. FirewallFabrik GUI uses the label, if it is not blank, to label interfaces in the tree. One of the suggested uses for this field is to mark interfaces to reflect the network topology ("outside" or "inside", for example) or interface purpose ("web frontend" or "backup subnet", for example).
- MAC: If you like, you can also specify the interface physical address. The MAC address is not necessary, but it can be used to prevent spoofing. If the feature is turned on and available, the firewall only accepts packets from the given IP address if the MAC address matches the one specified. Section 5.2.9.1 has more information.
- Interface type: Indicates the type of interface. Section 5.2.5 explains the interface types in more detail. Briefly, though, a Regular interface has a static IP addresses, a Dynamic address interface has a dynamic address provided by something like DHCP, an Unnumbered interface never has an IP address (a PPPoE connection, for example), and a Bridge port is an interface that is bridged in the firewall.
- Comment: free-form text field used for the comment.
- Address: If the interface has a static IP address, specify it here.
- Netmask: Use either a traditional netmask (255.255.255.0) or bit length (24, without slash) to specify the interface netmask. For IPv6 addresses, only bit length notation is accepted.
Once all the interfaces are configured, click Finish to create the new firewall object.
[!NOTE] You can always add, modify, and delete interfaces later using controls provided in the main window.
Creating a Firewall Object Using a Preconfigured Template
Another method you can use to create new firewall object is based on the use of preconfigured template objects that come with the program. To do this, select the "Use preconfigured template firewall objects" checkbox on the first page of the wizard, then click Next.
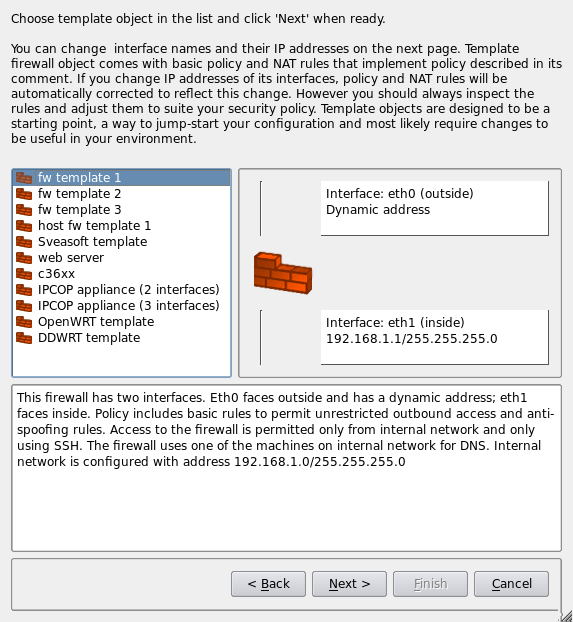
The program comes with several template objects. These include firewalls with two or three interfaces and a couple of firewall configurations intended for a server with one interface. Each template is configured with IP addresses and basic rules. Some templates assume all interfaces have static IP addresses, while others assume some interfaces have dynamic addresses. These template objects are intended to be a starting point that you can and should edit and modify to match your network configuration and security policy.
Choose the template that is closest to your configuration and click Next.
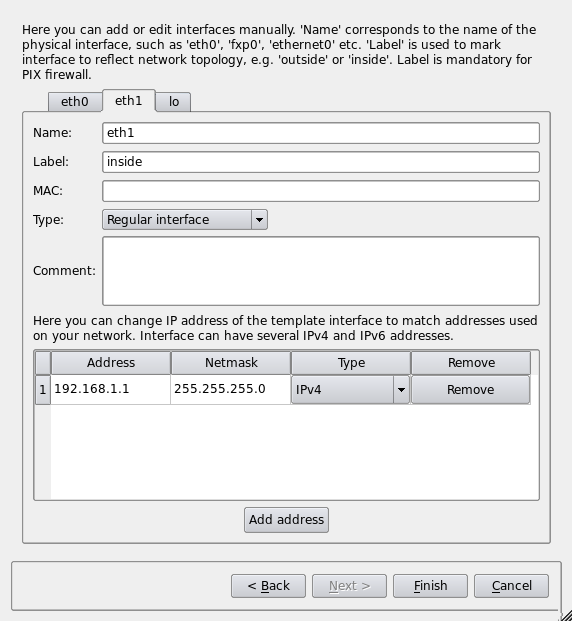
This page of the wizard allows you to change IP addresses used in the template. You can add and remove addresses using the Add address and Remove buttons. Since configuration of the template object depends on its interfaces, the dialog does not let you add or remove interfaces for objects created from a template. Each interface is represented by a tab in the tabbed widget; you can switch between them clicking the tabs with the interface names. Section 5.2.2.1 lists all elements of this page of the dialog and explains their purpose.
Each template firewall object comes preconfigured with some basic rules that use the firewall object, its interfaces, and network objects that represent subnets attached to interfaces. If you change addresses of interfaces in this page of the wizard, the program automatically finds all network objects used in the template rules matching old addresses and replaces them with new network objects representing subnets with addresses you entered in the wizard. This feature saves you from having to find and replace these objects manually.
Once all interfaces and addresses are entered or modified, click Finish to create the firewall object.
Creating a Firewall Object Using SNMP Discovery
If your firewall runs an SNMP daemon, you can save yourself some time by using SNMP discovery to automatically create the interfaces of the new firewall object.
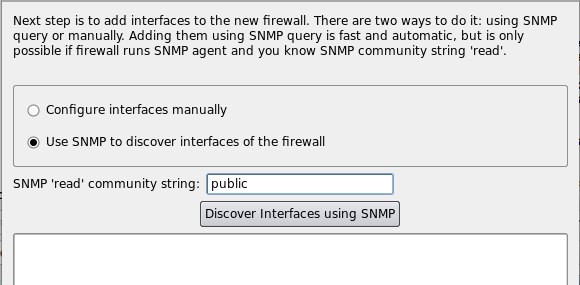
Start by checking the Use SNMP to discover interfaces of the firewall checkbox on the second page of the wizard and enter your SNMP "read" community. Then click Discover interfaces using SNMP.
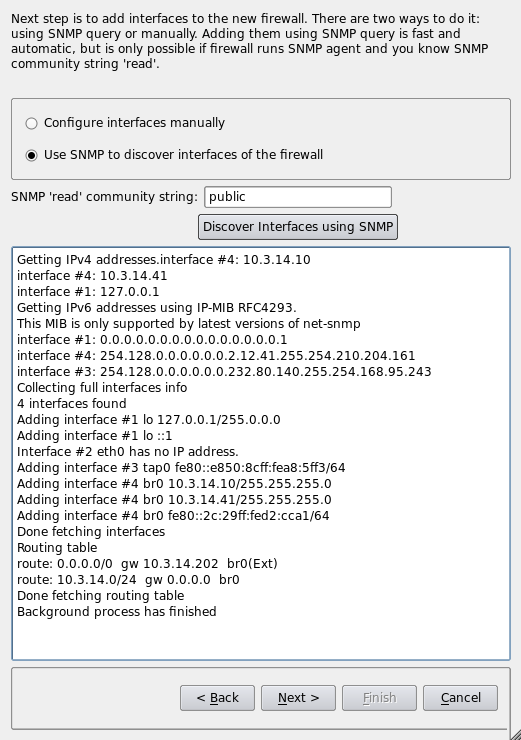
The program runs a series of SNMP queries to the firewall to read the list of interfaces and their addresses. Both IPv4 and IPv6 address can be imported. For IPv6, the firewall must support IP-MIB RFC 4293. Once the discovery process finishes, click Next.
The next page of the wizard offers an opportunity to review the discovered interfaces and make adjustments, if necessary. This is the same page described previously in Section 5.2.2.1. You can add and remove interfaces and add, remove, or change their IP addresses. Section 5.2.2.1 lists all elements of this page of the dialog and explains the purpose of each.
When configuration of all interfaces is correct, click Finish to create the new firewall object.
Editing a Firewall Object
The firewall object represents the firewall machine and is the most complex object in FirewallFabrik. It has three sets of controls that you can modify, not including the policy rule sets. All these controls become available when you double-click the firewall object in the tree.
Basic Firewall Controls
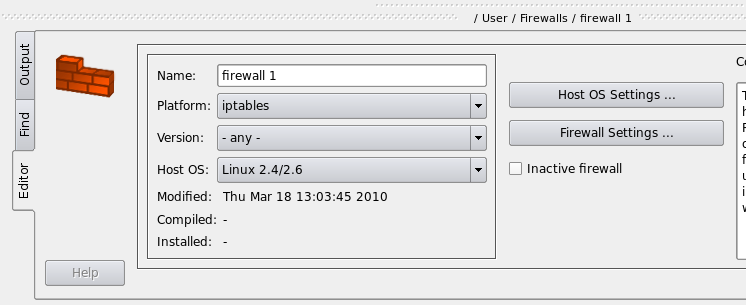
These controls let you specify the basic settings of the firewall, such as the name and firewall platform.
- Name: Specify or change the name of the firewall object.
- Platform: Specify or change the firewall software.
- Version: Specify or change the version number of the firewall software. In most cases, you can leave this set to any. In general, setting the version to "any" means the compiler only supports options available in all supported versions of the software. If you need a feature that is supported only by a particular version, then specify that version.
- Host OS: Specify or change the host operating system of the firewall device.
- Firewall Settings: Opens the Advanced Settings dialog for the platform or firewall software. Click Help in the dialog for assistance with dialog options. See Section 5.2.2.4.3 for a screen shot.
- Host OS Settings: Opens the Advanced Settings dialog for the indicated Host OS. Click Help in the dialog for assistance with dialog options. See Section 5.2.2.4.2 for a screen shot.
- Inactive firewall: Check this box to make the firewall object inactive. The firewall name changes from bold to a regular font to indicate that it is inactive, and the firewall is not available for compiling or installation. Essentially, this is a way to "comment out" the firewall object without deleting it.
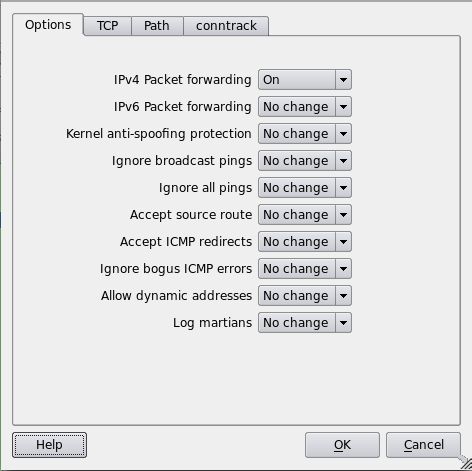
Host OS Settings Dialog
For explanations of the various controls, click the Help button in the dialog.
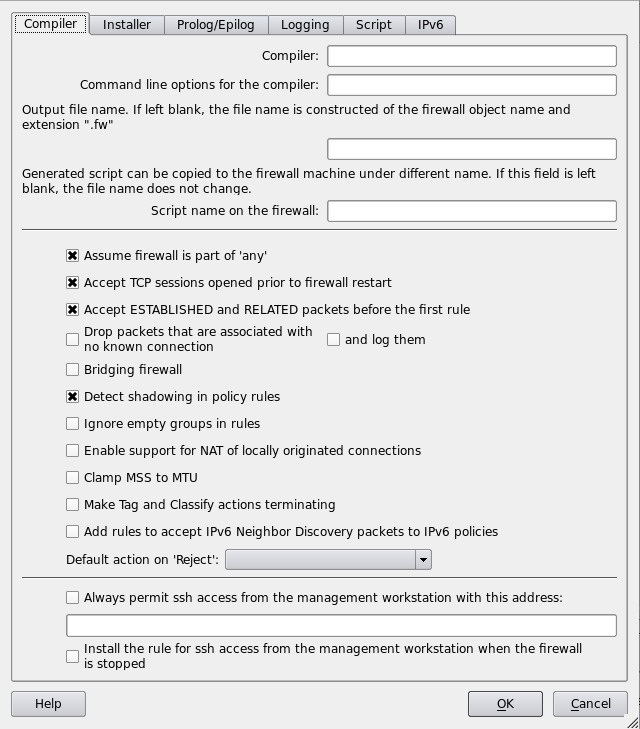
Firewall Settings Dialog
For explanations of the various controls, click the Help button in the dialog.
The Cluster Object
The cluster object represents an abstraction of a high availability (HA) setup that consists of two or more member firewalls, each represented by its own firewall object.
The object type "cluster" (located under Clusters in the tree) represents the HA pair. You configure policy and NAT rules in the rule sets of this object, rather than in those of the actual firewalls.
The procedure for setting up HA configuration is as follows:
- Create your firewall objects. Assign platform and host OS and name interfaces as usual. Do not add any policy or NAT rules. These are your real (member) firewalls. Interfaces should have their real IP addresses (not CARP or VRRP addresses).
- Create a cluster object. Configure the cluster object with the proper platform and host OS. Use the usual New Object menu or toolbar button to create this object. Note that in order for the firewall object to become a member of a cluster, their platform and host OS settings must match.
There are two ways to create new cluster object: you can use main menu "Object / New Object" option (or a toolbar button that calls the same function):
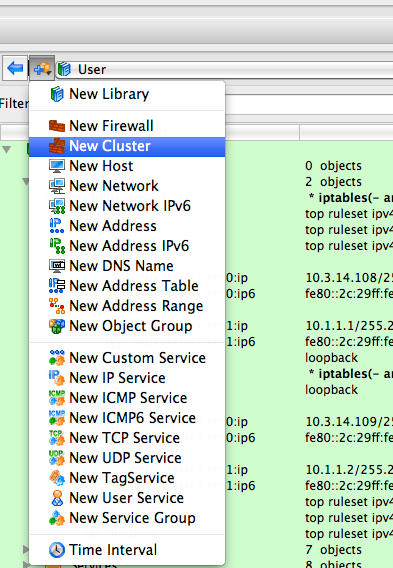
Using this menu option or toolbar button opens a wizard that guides you through the steps of creating new cluster object. The first page of the wizard shows all the available firewall objects. In this page, you choose which ones become cluster members:

Another method is to select two or more firewall objects that are to become cluster members, then right-click and select the "New cluster from selected firewalls" menu item. You can select two or more objects in the tree by clicking the object while holding the Ctrl key.
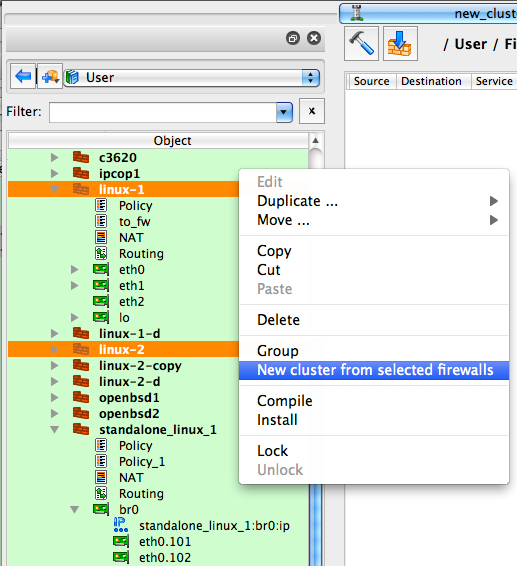
Using the right-click options launches the same wizard, but the list on its first page is already populated with the selected firewall objects, as shown below.
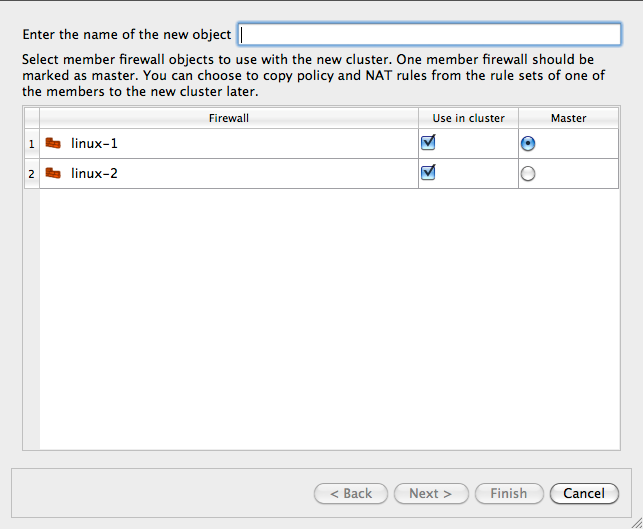
Reducing the number of firewall objects displayed in the wizard can be helpful when you have many of firewall objects defined in the object tree.
- The program guides you through the process of creating new cluster objects using a wizard-like dialog. You start with the list of firewall objects where you choose which firewalls should become members of the cluster. Next, the program finds interfaces of the member firewalls that have the same name and can be part of the cluster and creates cluster interfaces with the same name. Not all interfaces are eligible: for example, bridge ports, bonding interface slaves, and parents of VLAN interfaces cannot be used for the cluster. Cluster interfaces define failover groups. You can add, remove, or rename cluster interfaces, as well as change which interfaces of the member firewalls are used with each one. On the next page of the wizard you can change failover protocols and add, remove, or change IP addresses of cluster interfaces. Not all failover protocols require IP addresses: for example, VRRP or CARP do but heartbeat or OpenAIS do not. Finally, you can choose to use policy and NAT rules of one of the member firewalls to populate policy and NAT rule sets of the new cluster. If you do this, all references to the original member firewall and its interfaces in rules are replaced with references to the cluster and its interfaces. The program also creates backup copies of the member firewall objects with the name with suffix "-bak" and clears policy and NAT rule sets of the member firewall objects used with the cluster before the new cluster is created.
- If you use VRRP for failover, cluster interfaces are assigned virtual IP addresses. You can add the VRRP settings at the same time or add them later.
- If you use heartbeat or Corosync for failover, cluster interfaces should have the same names as the corresponding member firewall interfaces. In this case, cluster interfaces are virtual entities that represent interfaces of the corresponding member firewalls. The program makes the necessary substitutions when it compiles the rules.
- Each cluster interface has a child "Failover group" object with the name "firewall:carp0:members", or similar. This is the object where you configure associated member firewall interfaces. Double-click this object in the tree and then click "Manage Members" button in the dialog. Select interfaces of the member firewalls in the panel on the left-and side and click the Arrow button to add them to the list on the right. Use the checkbox to select the master. Click OK when done. The platform and host OS of the cluster object and members must match, otherwise firewall objects do not appear in the "members" dialog panel.
- Besides interfaces, the Cluster object has a new child object "State Sync Group". This group represents state synchronization protocol. Currently conntrackd is supported for Linux. To configure, double-click this object in the tree to open it in the dialog and click "Manage Members". Select the interfaces of the member firewalls in the panel on the left hand side and click the Arrow button to add them to the list on the right. Use the checkbox to select the master. Click OK when done. The new objects should appear in the "members" table in the State Sync Group dialog. The platform and host OS of the cluster object and members must match, otherwise firewall objects do not appear in the "members" dialog panel.
- The "Edit protocol parameters" button allows you to edit some parameters for the chosen failover protocol. This is how you configure an address and port for heartbeat and OpenAIS.
- There are few additional checkboxes in the "Script" tab of the firewall object dialog. These allow you to control whether the program add shells commands for creating and configuring bonding, bridge, and VLAN interfaces.
- Compile by right-clicking the cluster object and selecting "Compile". This compiles each member firewall separately, resulting in .fw and .conf files for both of them.
- Again, you configure all the rules in the policy and NAT rule sets that belong to the cluster object. If you put cluster's interfaces in rules, the program replaces them with interfaces of the member firewall when it compiles rules. If you put cluster object in a rule, it is like if you put member firewall object there instead, except the program automatically picks the member firewall it compiles the policy for.
- First, the program looks at Policy and NAT rule set objects of the cluster and member firewalls and compares their names. If there is rule set object with the same name in both the cluster and member firewall and both have non-zero number of rules, the rule set object from the member is used and the one from the cluster is ignored. The program prints a warning message when this is done. If rule set objects with the same name exist but the one in the member firewall has zero rules, it is ignored and the one from the cluster is used (no warning is issued). Likewise, if there are rule sets with the same name but the one in the cluster has zero rules, it is ignored.
- Here is what you need to do if you want to have most rules defined in the cluster so they will translate into rules for all member firewalls, but have some rules defined in the members so you can make configurations of the members slightly different:
- Create separate rule set object in the cluster and in each member. Use name different from "Policy" or "NAT". Lets use name "member_override".
- Create a rule with action "Branch" in the main Policy or NAT rule set of the cluster, drag rule set object "member_override" that belongs to the cluster to the well in the Branch action parameters dialog.
- Leave "member_override" rule set that is a child of the cluster object empty (no rules)
- Add rules to the rule set "member_override" in each member firewall
- Make sure rule set "member_override" is not marked as "Top ruleset" in the cluster and each member. This rule set translates into a user-defined chain (iptables) and should not be the "top ruleset".
Editing Rule Set Objects
Firewalls and clusters can have one or more of the following types of rule sets: access policy, NAT, and routing. A firewall has, by default, one access policy rule set, one NAT rule set, and one routing rule set. However, you can add additional rule sets if you like.
Rule sets are child objects of a firewall object. They cannot stand alone.
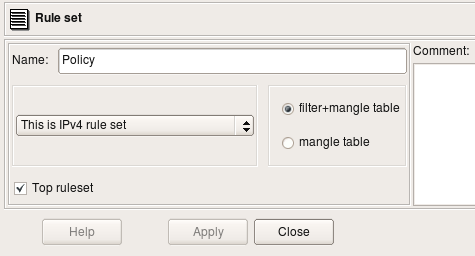
As objects, rule sets have parameters. In FirewallFabrik, rule sets have the following parameters:
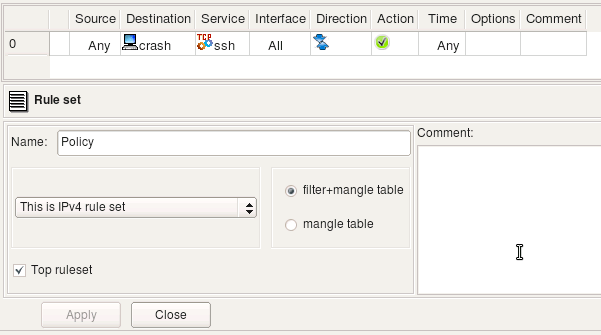
- Name: The name of the rule set. If you only have one of each type of rule set, you can leave this at its default.
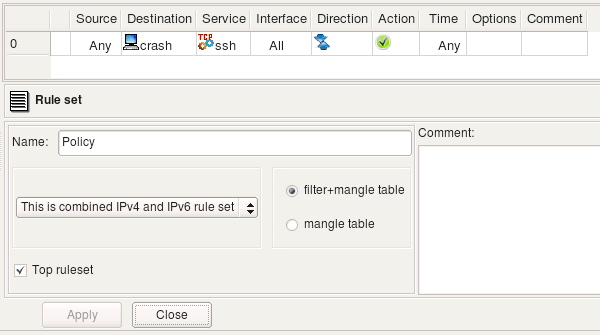
- Rule set family: This pull-down menu lets you specify whether policy compiler should treat the rule set as an IPv4 rule set, an IPv6 rule set, or a combined rule set. If set to IPv4, then only IPv4 rules are processed and IPv6 rules are ignored. The opposite is true if you specify an IPv6 rule set. If you select This is combined IPv4 and IPv6 rule set, then the compiler processes both types of rules and places them into the appropriate places in the install script.
- filter+mangle table or mangle table: These radio buttons let you specify whether the rules apply to the iptables filter table and mangle table, or just to the mangle table. (These radio buttons only appear for access policy rule sets, and only for iptables.) Under most circumstances, the compiler places each rule into the correct table (filter or mangle) automatically. However, some combinations of service objects and actions are ambiguous and can be used in both filter and mangle tables. In cases like these, you can clarify things for the compiler by creating a separate policy rule set to be translated only into the mangle table.
- Top ruleset: One of your rule sets must be the "top" rule set. The top rule set is the one used by the firewall. Other rule sets of that type are used only if you branch to them using branching logic in the top rule set. (If you don't use branching, then only the rule set tagged as "top" is used.)
- Comment: A free-form comment field.
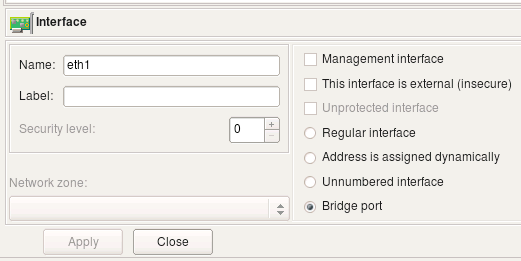
Interface Object
Interface objects belong to firewall or host objects. Interface objects cannot exist alone.
The dialog for the interface object that belongs to the firewall or host provides controls for the parameters described here. Controls that are only valid for the firewall, and not host objects, are marked as such.
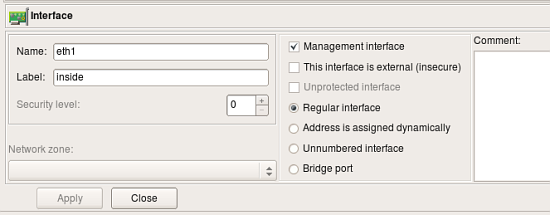
- Name: The name of the interface object in FirewallFabrik must match exactly the name of the interface of the firewall machine it represents. This will be something like "eth0", "eth1", "en0", "br0", and so on.
- Label: This field serves the purpose of a descriptive label. FirewallFabrik GUI uses the label, if it is not blank, to show interfaces in the tree. One of the suggested uses for this field is to mark interfaces to reflect the network topology (for example, "outside," "inside") or the purpose ("web frontend" or "backup subnet").
- Management interface: When a firewall has several network interfaces, one of them can be marked as the "management interface". The management interface is used for all communication between FirewallFabrik and the firewall. For example, the built-in policy installer uses the address of the management interface to connect to the firewall via SSH when it copies a generated script or configuration file. (This object applies to firewall objects only.)
- External interface (insecure): Marks an interface that connects to the Internet, or to an area that is outside the network protected by the firewall. (This obect applies to firewall objects only.)
- Unprotected interface: Marks interface to which FirewallFabrik should not assign any firewall rules. The policy compiler skips unprotected interfaces and does not generate rules for them. (This object applies to firewall objects only.)
- Regular Interface: Use this option if the interface has an IP address assigned to it manually (static IP address).
- Address is assigned dynamically: Use this option if the interface has a dynamic address (obtained via DHCP, PPP, or another protocol). In this case, the address is unknown at the moment when FirewallFabrik generates the firewall policy. Netfilter supports special chains called "INPUT" and "OUTPUT" that are guaranteed to inspect only packets destined for the firewall machine ("INPUT") or originated on it ("OUTPUT"). This allows FirewallFabrik to build correct firewall policy rules that affect the interface with a dynamic IP address; however, the interface must be marked as such for the policy compiler to use the proper technique. In cases where a rule requires the actual IP address of the interface (for example, anti-spoofing rules), the compiler adds a shell script fragment to determine the address at the time the firewall script is executed and then uses the address in rules.
- Unnumbered interface: Use this option if the interface can never have an IP address, such as the Ethernet interface used to run PPPoE communication on some DSL connections, or a tunnel endpoint interface. Although an unnumbered interface does not have an address, firewall policy rules can be associated with it.
- Bridge port: This option is used for a port of a bridged firewall. The compiler skips bridge ports when picking interfaces to attach policy and NAT rules to. For iptables, the compiler uses -m physdev --physdev-in or -m physdev --physdev-out for bridge port interfaces. (This object applies to firewall objects only.)
- Security level: The security level is either External or Internal. This helps the compiler distinguish between trusted and untrusted interfaces. (This object applies to firewall objects only.)
More about Security Levels
For iptables and nftables firewalls, the security level has two values: "External" or "Internal". Marking an interface as "External" tells the compiler that it faces an untrusted network (typically the Internet), while "Internal" indicates a trusted network. This distinction is used by the compiler when generating anti-spoofing and default policy rules.
Using Interface Objects in Rules
Policy rules in FirewallFabrik have a rule element called Interface. You can drag-and-drop, or copy/paste interface object into this column of a rule to make the firewall match not only the source and destination address and service, but also the interface of the firewall through which packets enter or exit. The direction of the packet is defined in column Direction. Consider the following example:

Rule #0 is "anti-spoofing" rule which relies on the ability to define interface and direction. It matches packets with source addresses equal to the addresses of the firewall's interfaces or internal network, but that are coming in from outside, which is determined by comparing the interface through which packets enter the firewall. Packets with "internal" addresses cannot normally come from outside, and if they do, they must be spoofed and should be dropped. This is what this rule does: it drops and logs these packets. Rule #1 permits connections originating from the internal network going out, but it makes sure these packets enter the firewall through its internal interface.
These two rules generate the following iptables script:
#
# Rule 0 (eth0)
#
$IPTABLES -N In_RULE_0
$IPTABLES -A FORWARD  -i eth0  -s 192.0.2.1  -j In_RULE_0
$IPTABLES -A FORWARD  -i eth0  -s 172.16.22.1  -j In_RULE_0
$IPTABLES -A FORWARD  -i eth0  -s 192.168.2.1  -j In_RULE_0
$IPTABLES -A FORWARD  -i eth0  -s 172.16.22.0/24  -j In_RULE_0
$IPTABLES -A In_RULE_0  -j LOG  --log-level info --log-prefix "RULE 0 -- DENY "
$IPTABLES -A In_RULE_0  -j DROP
#
# Rule 1 (eth1)
#
$IPTABLES -A FORWARD  -i eth1  -s 172.16.22.0/24  -m state --state NEW  -j ACCEPT
Here all iptables commands have an "-i eth0" or "-i eth1" clause, which makes iptables compare the interface and direction.
FirewallFabrik compiles the same rules for either iptables or nftables; the target platform of the firewall object determines the output format.
So far, the examples in this section have demonstrated how to use Interface objects to associate policy rules with interfaces so as to match packets crossing certain interface. An interface object can be used in the "source" and "destination" of rules just like any other addressable object. In this case, FirewallFabrik replaces the interface object with the set of its addresses, picking only those addresses that match the address family (IPv4 or IPv6 or both) assigned to the rule set.
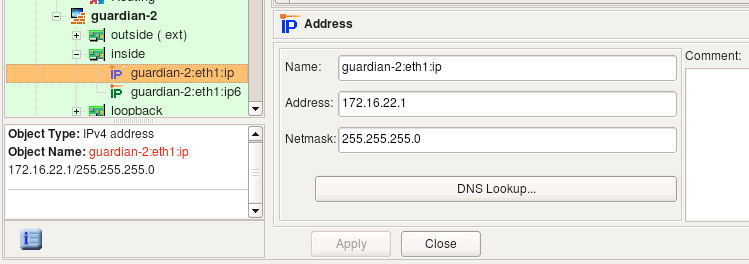
For example, we start with a firewall configuration where interface eth1 has two IP addresses, one IPv4 and another is IPv6. Note that this could be a host object as well because interfaces can belong either to a Firewall or a Host object.
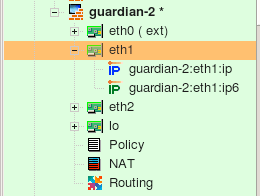
Interface eth1 has IPv4 address 172.16.22.1 and IPv6 address fe80::21d:9ff:fe8b:8e94. It is used in a simple policy rule as follows:

This policy rule set is configured as a mixed IPv4+IPv6 rule set. For iptables, the compiler generates the following code:
# --------------- IPv4
# Rule 0 (global)
#
$IPTABLES -A INPUT -p tcp -m tcp  -d 172.16.22.1  --dport 22  -m state \
 --state NEW  -j ACCEPT

# --------------- IPv6

# Rule 1 (global)
#
$IP6TABLES -A INPUT -p tcp -m tcp  -d fe80::21d:9ff:fe8b:8e94  --dport 22 \
 -m state --state NEW  -j ACCEPT
Since the interface has two addresses, one IPv4 and another IPv6, the compiler generates commands in both the IPv4 and IPv6 sections of the script, but it uses only the appropriate address in each. Other than that, the interface object behaves just like a set of addresses when used in the source or destination element of a rule. It can also be used in NAT rules. Here is an example:

This generates the following code for iptables:
# Rule 0 (NAT)
#
$IPTABLES -t nat -A POSTROUTING -o eth0  -s 172.16.22.0/24 -j SNAT \
--to-source 192.0.2.1
#
# Rule 1 (NAT)
#
$IPTABLES -t nat -A PREROUTING  -p tcp -m tcp  -d 192.0.2.1 --dport 80 \
-j DNAT --to-destination 172.16.22.100
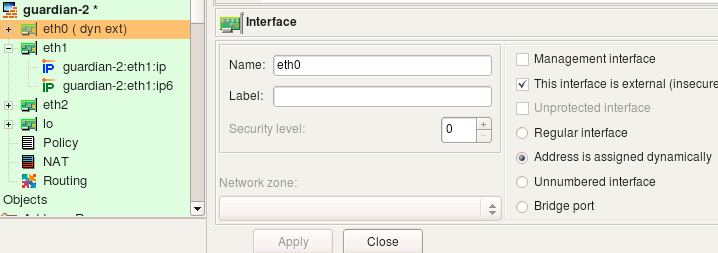
Using Interface Object with Dynamic Address in Rules
The examples above demonstrated what happens when an interface with one or several IP addresses is used in policy and NAT rules. Let's look at the case when an interface has an address assigned dynamically. This means the address is unknown to the FirewallFabrik policy compiler when it generates the configuration script. The compiler uses features of the target firewall to work around this. Here is the configuration of the interface object eth0. The radio-button Address is assigned dynamically is selected.
The following policy rule uses interface eth0 in destination:

Here is the result for iptables:
getaddr eth0  i_eth0
getaddr6 eth0  i_eth0_v6

# --------------- IPv4

# Rule 0 (global)
#
test -n "$i_eth0" && $IPTABLES -A INPUT -p tcp -m tcp  -d $i_eth0  --dport 22 \
 -m state --state NEW  -j ACCEPT

# --------------- IPv6

# Rule 0 (global)
#
test -n "$i_eth0_v6" && $IP6TABLES -A INPUT -p tcp -m tcp -d $i_eth0_v6  \
 --dport 22  -m state --state NEW  -j ACCEPT
The shell functions "getaddr" and "getaddr6" are defined earlier in the script. The generated script determines IPv4 and IPv6 addresses of interface eth0 at the time of execution and then uses the values in iptables commands. If the interface does not have an address, the corresponding variable gets an empty string for its value and the iptables command using it is skipped.
Using Interface Object in Rules of Bridging iptables Firewall
In case of the "normal" iptables firewall, FirewallFabrik adds an "-i eth0" or "-o eth0" parameter to the generated iptables command to make it match interface and direction. If radio button "Bridge port" is turned on in the interface object, the compiler uses a different option to make iptables match packets crossing bridge ports. Here is the interface "eth1" which is configured as a bridge port:

Consider the following rule in the policy of the firewall this interface belongs to:

This rule matches interface "eth1" and generates the following iptables command:
$IPTABLES -A FORWARD  -m physdev --physdev-in eth1  -s 172.16.22.0/24 \
 -d 172.16.22.255  -m state --state NEW  -j ACCEPT
Since the interface is now a bridge port, the compiler uses "-m physdev --physdev-in eth1" to match it.
IPv4 Address Object
The regular address object describes single a IPv4 address. It can be a child of an interface object, in which case it represents an IP address and netmask of the interface, or it can be used as a standalone object. In the latter case it does not have a netmask and is located in the Objects/Addresses branch of the objects tree.
When Used as Address of Interface
In this case the object is a "child" or "leaf" under the an interface object, either on a host or a firewall object. To create this kind of an address, right-click the interface object to bring up the context menu.
Its dialog provides the following entry fields:
- Name
This is the name of the object. Use a descriptive name because when the address object is used in the firewall policy, it is labeled with this name. It may be hard to tell one address from another if their names are similar.
- Address
This is an IP address. The GUI widget provides syntax control for the values entered in the field. (This syntax control activates when you save the object.)
[!NOTE] A typical error is to interpret this object as an address of the subnet to which the interface of the host or firewall belongs. This object represents an address of the interface, not a network address. (So, 192.168.1.1, not 192.168.1.0)
- Netmask
This is a netmask assigned to the interface. You can enter the netmask using the traditional method (255.255.255.0) or using network bit length notation ("24"). Bit length notation is converted to a traditional netmask by FirewallFabrik.
- DNS Lookup
If the host object has the same name as the actual machine, then clicking this button generates a DNS query that populates the interface IP address and subnet. Only the parent host or firewall object's name is used for the DNS query; the name of the interface is ignored and can be anything.
- Comment
This is free-form text field for a comment.
Here we use our IPv4 address in a rule (remember, it belongs to the interface):

FirewallFabrik's iptables compiler, for example, generates the following command from this rule:
$IPTABLES -A INPUT -p tcp -m tcp  -d 172.16.22.1  --dport 22  -m state \
 --state NEW  -j ACCEPT
Note how even though the address object has a netmask, the generated command matches the address as a host address, not as a subnet. This is because the netmask is used only to describe the subnet for the interface, not to describe the subnet. When this address object is used in a rule, it is understood that the intention is to match the address of the interface it belongs to rather than any address on the subnet. Use the network object if you need to match a whole subnet.
This iptables rule was placed in the INPUT chain because the object in the "Destination" was an address of an interface of the firewall. While processing the policy for the iptables target firewall platform, FirewallFabrik compares addresses in the source and destination of a rule to the addresses of all interfaces of the firewall to find rules that control access to and from the firewall. FirewallFabrik places these rules into INPUT or OUTPUT chains. This is only necessary for iptables.
When Used as Stand-Alone Object
In this case the object is located in the Objects / Addresses part of the objects tree and does not have a netmask entry field. To create this kind of an address, use the New Object menu to select New Address or use the right-click menu associated with the addresses folder in the tree.
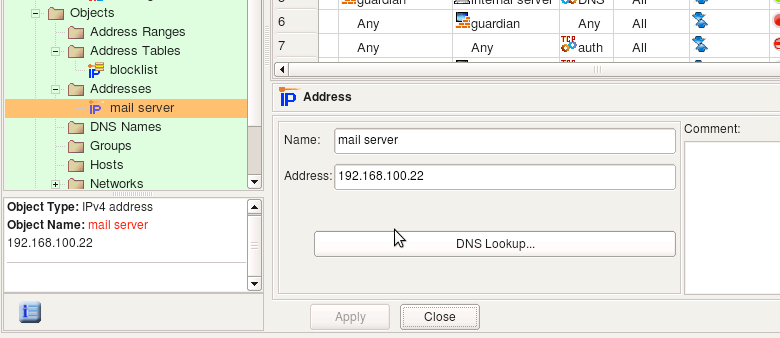
Dialog fields Name, Address and Comment have the same purpose and properties as an address object assigned to an interface object.
The DNS Lookup button can be used to automatically populate the address field using a DNS query. The program runs DNS query for the "A" record with the name of the address object. The object name does not have to match any DNS record if you never plan to use this feature. DNS query function is just a convenience, but to use it, the name of the object must match a DNS record.
IPv6 Address Object
The IPv6 address object is similar to the IPv4 address object. Like IPv4 address objects, it can be used both as a child of an interface object or as a stand-alone object.
When Used as Address of Interface
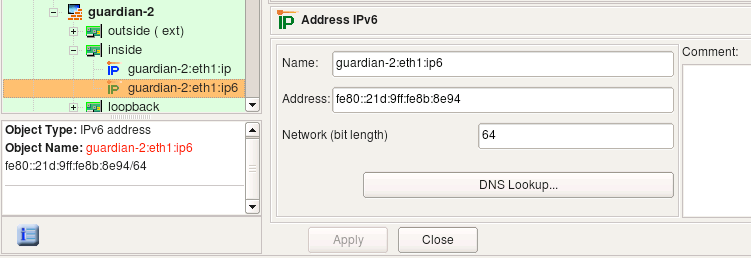
If it is used to describe an IPv6 address of an interface, it has a netmask represented as bit length. Unlike with IPv4 address object, an IPv6 netmask is never represented as a colon-separated string of octets.
When Used as Stand-Alone Object
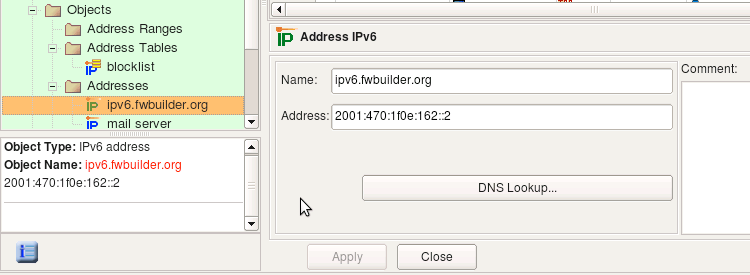
In this case this object is located in the Objects / Addresses part of the objects tree (the same place where stand-alone IPv4 addresses are located) and does not have a netmask entry field. To create this kind of an address, use the New Object menu item New Address IPv6 or the right-click menu associated with the addresses folder in the tree.
Policy compilers treat IPv6 addresses in policy rules according to the same algorithms as those for IPv4 rules. For example, just like with IPv4, the compiler for iptables checks whether an address matches an address of any interface of the firewall to determine if the rule should be placed in the INPUT or OUTPUT chain.
Consider the rule shown in the screenshot below where we use two IPv6 address objects. One object belongs to the interface inside of the firewall while another is the IPv6 address of the project's web site.

For iptables, FirewallFabrik generates the following commands from this rule:
$IP6TABLES -A INPUT -p tcp -m tcp  -d fe80::21d:9ff:fe8b:8e94  --dport 80  \
-m state --state NEW  -j ACCEPT
$IP6TABLES -A FORWARD -p tcp -m tcp  -d 2001:470:1f0e:162::2  --dport 80  \
-m state --state NEW  -j ACCEPT
The rule that matches the address described by object guardian-2:eth1:ipv6 went to the INPUT chain because compiler detected that this rule matches packets that are headed for the firewall itself, which iptables inspects in the INPUT chain. The rule that matches the address described by the object ipv6.FirewallFabrik.org went to the FORWARD chain because these packets go through the firewall.
Attached Network Objects
There is a special type of interface child object, called the Attached Network object, that represents the networks that are directly attached to the interface. Figure 5.35 shows an example firewall configuration for a firewall with two network interfaces.
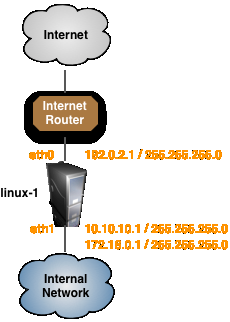
In the example configuration one of the interfaces, eth0, has one IP address and the other interface, eth1, has two IP addresses as shown in Table 5.2.
| Interface | Attached Network |
|---|---|
| eth0 | 192.0.2.0/24 |
| eth1 | 10.10.10.0/24 |
| eth1 | 172.16.0.0/24 |
Table 5.2. Attached Networks
To create an object that matches the attached networks, select an interface, right-click on the interface and select New Attached Network from the context menu as shown in Figure 5.36.
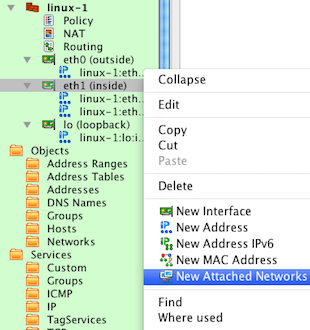
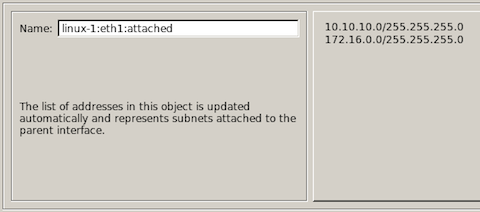
This will create a new child object under the eth1 interface object called linux-1:eth1:attached.

If you open the object for editing as shown in Figure 5.38 you will see the list of all networks that are currently attached to the eth1 interface. If you add or delete IP addresses from the interface the Attached Network object will be automatically updated.
The Attached Network object can than be used in rules just like any other Network object. Figure 5.39 shows an example of using the Attached Network object from the eth1 interface in a NAT policy rule.

Compiling this rule for an iptables firewall results in the output shown below.
echo "Rule 0 (NAT)"
#
$IPTABLES -t nat -A POSTROUTING -o eth0 -s 10.10.10.0/24 -j SNAT --to-source 192.0.2.1
$IPTABLES -t nat -A POSTROUTING -o eth0 -s 172.16.0.0/24 -j SNAT --to-source 192.0.2.1
[!NOTE] You can also use the Attached Network object with interfaces that are configured as "Address is assigned dynamically". In this case the script generated by FirewallFabrik will determine the attached network based on the IP address that is assigned to the interface at the time that the script is run.
Physical Address Objects
The physical address object describes the hardware, or media, address of an interface. Currently only Ethernet MAC addresses are supported, but support for other kinds of physical addresses may be added in the future.
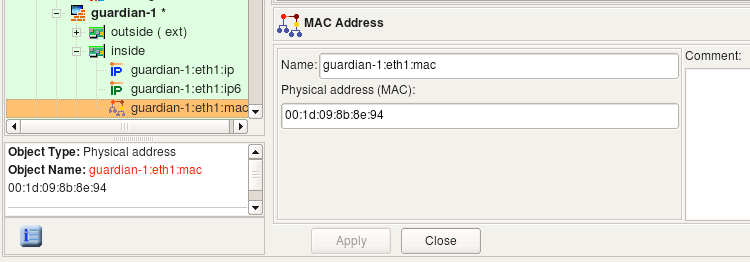
The physical address object can only be a child of an interface; it cannot exist as a stand-alone object. To create this kind of address object, right-click an interface object in the tree, then select New MAC Address.
- Name
This is the name of the object. The field is populated automatically with a host:interface:addressType descriptive name when the object is created, but you can change it immediately or later. If you change the name, use something descriptive because when the address object is used in the firewall policy, it is labeled with this name. It may be hard to tell one address from another if their names are similar.
- Address
This is a string representation of the physical or media address. For many types of media, this will be in a binary representation. For example, an Ethernet address would be represented as a string of six octets.
- Comment
This is free-form text field for a comment.
Using in Policy Rules
Netfilter/iptables supports physical address (MAC) filtering.
As described in Section 5.2.10.4, if an interface object that has multiple child address objects is used in a rule element (either Source or Destination), then the policy compiler tries to generate a rule using all of them. Section 5.2.10.4 explains that the compiler actually does this by generating multiple rules using each address in turn. This roughly corresponds to using the logical operation "OR" on the IP addresses: if our interface has two addresses, Address1 and Address2, then the generated rule matches if the address in the packet is either Address1 OR Address2. The case of a physical address is different, though. If the interface has a physical address, then the compiler builds a rule that has to match an IP address and the MAC address. The reason is to combat IP spoofing.
Suppose we have a very important host on the network. We create a host object, then add an interface to it. The interface should have both address and physical address objects as shown in Figure 5.41. The two child objects are visible in the tree under the Interface "eth0".

[!NOTE] Note how MAC matching is checked in the host object dialog. This makes the compiler use the MAC addresses of the interfaces of this host.
Because this is a very important host, we would like to be sure that packets whose source IP is that of this host are really coming from it and are not spoofed. The best way to achieve this goal is to use strong authentication, for example, using the IPSec protocol. The use of IPSec is outside the scope of this document, since our goal here is to show that inspecting the MAC address of the packet can improve security.
Both a real packet originated from this host and a spoofed packet have a source IP address of the interface of this host, but the source MAC address is going to be different if spoofing is occurring. We can use this fact to catch and drop spoofed packets. Here are three possible ways to build security policy for this situation:
- Using only address object in the rule element. This means the firewall inspects only IP address and ignores the MAC address of the packets.

FirewallFabrik generates the following simple iptables command for this rule:
bash
  $IPTABLES -A FORWARD  -s 10.3.14.44  -m state --state NEW  -j ACCEPT
- Using only a physical Address object. A rule built this way permits all kinds of traffic coming from the trusted host even if its IP address changes.

For this rule, the following iptables command is generated:
bash
  $IPTABLES -A FORWARD  -m mac --mac-source 00:1D:09:8B:8E:94 -m state --state NEW \
  -j ACCEPT
- Using a host or interface object. This way we end up with a rule that matches on a combination of the IP address and MAC address. This may be used as a sophisticated anti-spoofing rule.


For this rule, the following iptables command is generated:
bash
  $IPTABLES -A FORWARD  -m mac --mac-source 00:1D:09:8B:8E:94 -s 10.3.14.44  -m state \
   --state NEW  -j ACCEPT
Using address and physical address objects in a rule is not the same as using the host or interface object to which these address and physical address belong. Here is what happens if we put objects representing IP address and MAC address in the rule:

For this rule, the following iptables commands are generated:
$IPTABLES -A FORWARD  -s 10.3.14.44  -m state --state NEW  -j ACCEPT
$IPTABLES -A FORWARD  -m mac --mac-source 00:1D:09:8B:8E:94 -m state --state NEW \
-j ACCEPT
As described in Section 5.2.10.4, using an multiple objects in the rule element is like bundling them together using logical operation OR. If we were to put address and physical address in the rule as in Figure 5.46, we would end up with a policy matching packets that have the source address 10.3.14.44 or MAC address 00:1D:09:8B:8E:94, but not necessarily both at the same time. Any host that manages to pretend to have the IP address 10.3.14.44 would be able to send packets through our firewall even if its MAC address is different. To achieve our goal and make sure packets with the source 10.3.14.44 really belong to our important host, we should be checking its IP address and MAC address at the same time and let a packet through only if its IP address AND MAC address are what we expect them to be. That is why FirewallFabrik treats physical addresses differently and generates firewall code that inspects both IP address and physical address.
FirewallFabrik generates firewall code to inspect MAC address only for host objects with the option MAC address filtering turned on. If this option is off, the physical address object is ignored even if it is present in the host object's interface. This is because host objects created using the Network Discovery Druid (Section 6.2) are often populated with both IP address and MAC address information (available through SNMP query), but inspection of MAC addresses is rarely needed. Use the MAC address filtering option in the host object to specify that you want the MAC address to be verified for the host.
[!NOTE] The target firewall imposes certain restrictions on rules matching the MAC address. For example, only source MAC addresses can be matched. FirewallFabrik is aware of these restrictions, and the policy compiler issues an error if a physical address object is used in a rule that would lead to an impossible iptables command.
Host Object
The host object in FirewallFabrik is designed to represent real hosts in the network: workstations, servers, and any other network node with an address. Just like real hosts, host objects have interfaces that represent different physical connections to the network.
Most hosts have just a single (visible) interface with a single IP address. In that case the actual interface and its name do not matter. For most foreign hosts, FirewallFabrik assigns an arbitrary name, like "interface1", to the host's interface. However, by using the tree-like hierarchy of hosts -> interfaces -> addresses, it is possible to specify the exact address and/or interface of a host in cases where it does matter.
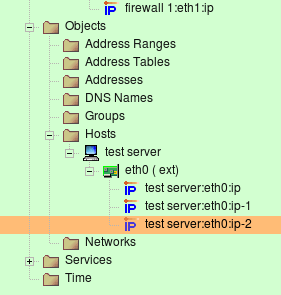
As in the Firewall object, interfaces and addresses are represented by objects that are organized in a tree. An interface can have multiple addresses. An example of a host with one interface and multiple addresses is shown in Figure 5.47. Host "test server" is located on the LAN and has three virtual IP addresses that all belong to the same interface, "eth0".
Note that in FirewallFabrik, the host object is an abstraction. It does not have to conform to an individual host. This host object may in fact represent a web farm that accepts connections on three IP addresses, each on a different computer.
[!NOTE] The host object cannot have any access, NAT, or routing policy associated with it; only firewall objects can have policies.
Creating
To speed up the process and make it simpler, creating a new host object is aided by a wizard that is similar to the one for creating a new Firewall Objects.
To launch the wizard, select New Host from the New Object menu or right-click Hosts and select it from there.
Section 5.2.2 shows how to use the firewall object wizard. The host object wizard is the same, with the following exceptions:
- All methods
You do not specify the operating system or platform for host objects.
- From template
The Host object templates are different than those for Firewall objects. Browse through the list in FirewallFabrik to see what's available.
- Manually
This method works the same as for the Firewall object, though the Add Interfaces page is slightly different. You cannot tag an interface as a "bridge port" interface. You can, however, indicate it is unnumbered or dynamic by selecting the appropriate checkbox. If neither checkbox is selected, then the interface is assumed to have a static IP address. As with the firewall object wizard, you can only add IPv4 addresses in this way. If you need to use IPv6 addresses, create the host object without IP addresses and add them later.
- Via SNMP
This method works the same as for a Firewall object. The host object must have the same name as the actual device and the host must respond to SNMP.
[!NOTE] You can always add, modify, and remove interfaces of the new host object later using controls provided in the main window and object tree view.
Editing
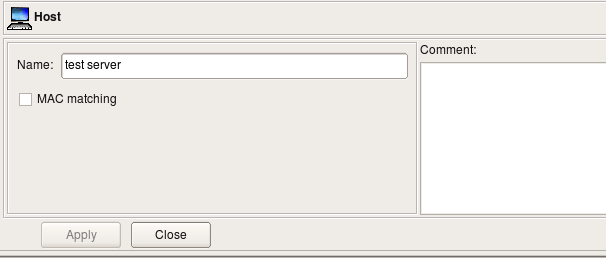
The Host object dialog allows you to edit the following parameters:
- Name:
The host object name.
- MAC matching:
If this option is activated, the policy compiler uses the MAC addresses of all interfaces of this host in the firewall rules. Not all firewall platforms support MAC address filtering, so this option may have no effect on the generated firewall script. This is treated as a non-critical situation, and the policy compiler will only generate a warning while processing a firewall policy where such a host is used. You cannot enter the physical (MAC) address in this dialog, however. See Section 5.2.9.1.
- Comment:
This is a free-form text field which can be used to add comments.
Using in Rules
When a host object is used in a rule, it acts as a group of all of the addresses that belong to all of its interfaces. The only exception is the loopback interface; the compiler skips that address when replacing the host object with its addresses.
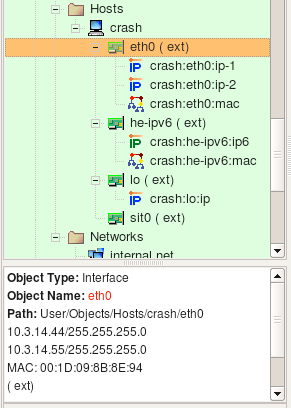
Consider the following Host object. It has interface eth0 with two IP addresses and a MAC address, interface he-ipv6 with an IPv6 address and a MAC address, interface lo (loopback) with its own IP address and interface sit0 (tunnel) with no address.

Let's put this host object in a rule as follows:
The rule set is configured as "IPv4 only", so even though interface he-ipv6 has IPv6 address, FirewallFabrik will ignore it while generating iptables commands for this rule. Interface eth0 has two IPv4 addresses and both will be used. Here are iptables commands generated for this rule:
$IPTABLES -A FORWARD -p tcp -m tcp  --dport 22  -m state --state NEW \
-j Cid6066X5981.1
$IPTABLES -A Cid6066X5981.1  -d 10.3.14.44  -j ACCEPT
$IPTABLES -A Cid6066X5981.1  -d 10.3.14.55  -j ACCEPT
$IPTABLES -A Cid6066X5981.1  -d   -j ACCEPT
Let's see what we get for the same rule if we configure rule set object as "IPv4+IPv6":
Since the rule is now configured to compile for both address families, FirewallFabrik processes it twice, once for each address family. Here is what we get (these are relevant fragments of the generated script):
# --------------- IPv4

$IPTABLES -A FORWARD -p tcp -m tcp  --dport 22  -m state --state NEW \
-j Cid6066X5981.1
$IPTABLES -A Cid6066X5981.1  -d 10.3.14.44  -j ACCEPT
$IPTABLES -A Cid6066X5981.1  -d 10.3.14.55  -j ACCEPT
$IPTABLES -A Cid6066X5981.1  -d   -j ACCEPT

# --------------- IPv6

$IP6TABLES -A FORWARD -p tcp -m tcp  --dport 22  -m state --state NEW \
-j Cid6066X5981.1
$IP6TABLES -A Cid6066X5981.1  -d fe80::a3:e2c  -j ACCEPT
Using Objects With Multiple Addresses
Host and firewall objects have child interface objects, which in turn have child address and physical address objects. In fact, an interface object can have more than one associated address object. Let's see how this works:
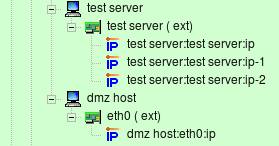

Consider example Figure 5.52, Figure 5.53. Here interface eth0 of "test server" has three IP addresses (named "test server:eth0:0" through "test server:eth0:2") and interface eth0 of "dmz host" has only one IP address: "dmz host:eth0". Policy rule #9 says that "dmz host" can talk to "test server" using any protocol. Since "test server" has three different addresses, we need to generate policy a rule that will match any of them. (Obviously we cannot match all three at once, so the compiler uses a logical "OR", not a logical "AND" here.) Basically, rule #9 is equivalent to three separate rules, each of them using one address of "test server" in turn. These three rules are represented in Figure 5.54 (original rule #9 also shown there, but it is disabled.)

FirewallFabrik takes care of this situation automatically and generates the firewall policy described in Figure 5.53 as if a user had built a policy in the GUI using the three rules as shown in Figure 5.54.
In fact, the algorithm used is even more general. In the example Figure 5.53, host "test server" has a single interface with multiple addresses that the compiler used to generate the target firewall code. The policy compiler works in a similar way even if the host or firewall object used in the rule has multiple interfaces and each interface, in turn, has multiple addresses. If a host (or firewall) object is used in the rule, then the compiler scans all its interfaces, finds all corresponding addresses, and uses them to generate the firewall configuration. If an interface object is used in the rule, then the compiler uses all its addresses. And finally, if an address or physical address object is used in the rule, then the compiler uses only this parameter to generate the firewall configuration. In other words, the compiler always traverses the tree, starting from the object found in the policy rule, and uses the parameters of all address and physical address objects it finds. IPv4 Network Object \~\~\~\~\~\~\~\~\~\~\~\~\~\~\~\~\~\~\~~
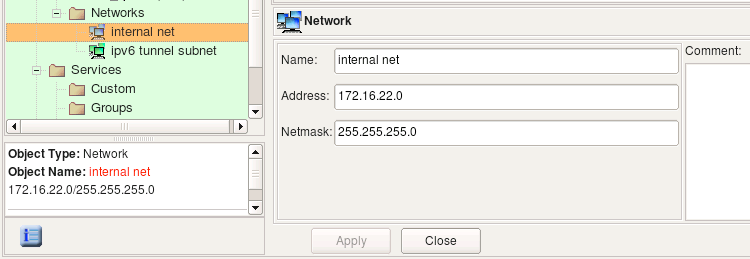
The network object describes an IP network or subnet. Use main menu Net Object / New Network item to create objects of this type. The Network object dialog object provides the following entry fields:
- Name:
Network Object Name
- Address:
The IPv4 address of the network.
- Netmask:
The netmask, in combination with an address, defines the subnet. You can enter either a string octet representation of the mask or its bit length here; however the program always converts it to the octet representation.
- Comment:
This is a free-form text field used for comments.
Let's use the network object shown above in a policy rule.

Here is what we get for iptables:
$IPTABLES -A FORWARD -p tcp -m tcp  -s 172.16.22.0/24  --dport 80  -m state \
--state NEW  -j ACCEPT
IPv6 Network Object
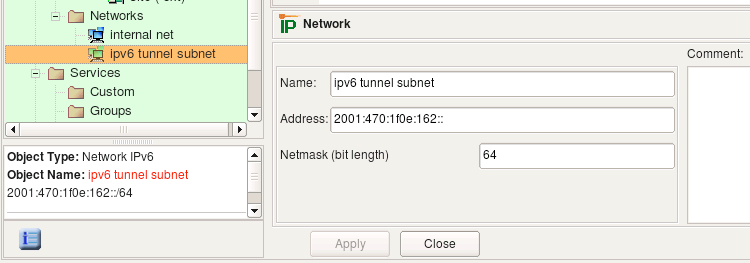
The network object describes an IPv6 network or subnet. This object is very similar to the IPv4 network object, except you can only enter netmask as a bit length. Use main menu "Net Object / New Network IPv6" item to create objects of this type.
Let's see what we get if we use an IPv6 network object in a policy rule as shown:

Here is the command generated for iptables:
$IP6TABLES -A FORWARD -p tcp -m tcp  -s 2001:470:1f0e:162::/64  --dport 80  \
-m state --state NEW  -j ACCEPT
Address Range Object
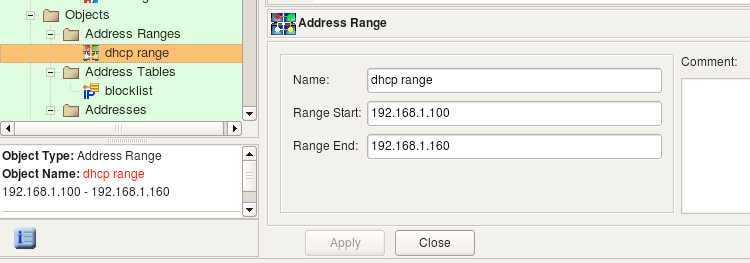
The address range object describes a continuous range of IPv4 or IPv6 addresses. To create a new address range object, use the main menu New Object / New Address Range option. Its dialog provides the following entry fields:
- Name:
The name of the address range object
- Range start:
The address of the start of the range.
- Range end:
The address of the end of the range.
- Comment:
A free-form text field used for comments.
The address range is inclusive; that is, both the start and the end addresses are included in the range.
When the address range object is used in a rule, FirewallFabrik replaces it with a list of addresses equivalent to the specified range. The program tries to generate the most economical representation of the range using a combination of subnets of different lengths. Consider the address range object shown above. This address range object represents IP addresses between 192.168.1.100 and 192.168.1.160 (inclusively). It would be wasteful to generate 61 iptables commands to represent this range. Instead, the compiler uses a combination of several subnets of different lengths and ends up with the following:
$IPTABLES -A FORWARD  -s 192.168.1.100/30  -m state --state NEW  -j ACCEPT
$IPTABLES -A FORWARD  -s 192.168.1.104/29  -m state --state NEW  -j ACCEPT
$IPTABLES -A FORWARD  -s 192.168.1.112/28  -m state --state NEW  -j ACCEPT
$IPTABLES -A FORWARD  -s 192.168.1.128/27  -m state --state NEW  -j ACCEPT
$IPTABLES -A FORWARD  -s 192.168.1.160  -m state --state NEW -j ACCEPT
Address Tables Object
Sometimes you need to apply a rule to a set of addresses, but you don't know what those addresses will be when you're writing the policy. The address table object object can help in these situations.
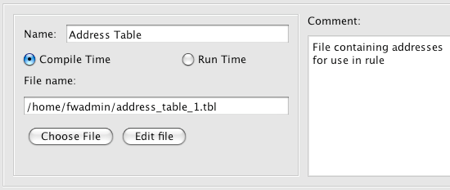
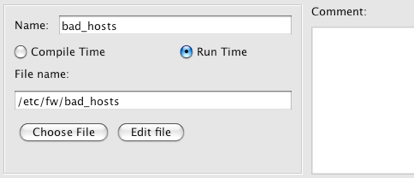
The address table object has the following fields:
- Name:
The name of the address table object.
- Compile Time / Run Time:
Indicates whether you want the file to be loaded with the firewall compiler runs (Compile Time) or when the firewall runs the firewall script (Run Time).
- File name:
The name of the text file you want to load. (The file contains IP addresses or IP address ranges.) The filename can have any extension. If you want the file to load at run time, you must specify the path and name where the file will be on the firewall machine, not on the client machine.
- Choose File button:
Used to populate the file name and path if the file is on the local machine. You can also type in a path to a filename that you want to create.
- Edit File button:
Once the File name field is populated, use this button to view and update the file. If the file does not already exist, FirewallFabrik will generate a warning message.
- Comment:
A free-form text field used for comments
The Compile Time and Run Time radio buttons define when the addresses will be read from the file: when the firewall script is generated by FirewallFabrik or when the firewall runs the script.
If object is configured as Compile Time, the FirewallFabrik policy compiler opens the file during compilation and replaces the address table object in policy rules with the set of addresses from the file. This means the file with addresses must be accessible on the machine where the FirewallFabrik GUI and policy compilers run.
If the object is configured as Run Time, policy compiler does not try to find and open the file but instead generates a firewall script that will do this when it is activated. This means the file with addresses must be located where it is accessible by the firewall, and the object must be configured with the full path to it on the firewall.
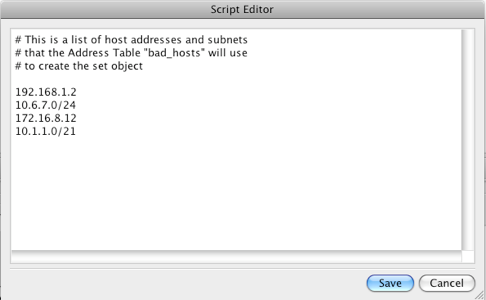
Here is an example of the file contents (this is what you see if you click the Edit File button in the object dialog):
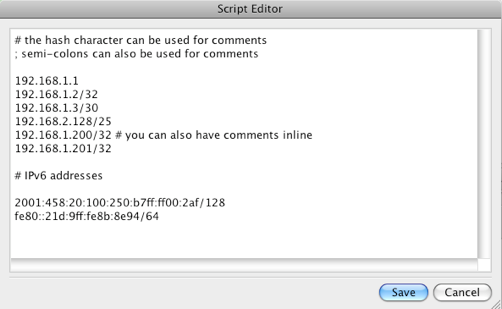
Note that comments in the file can start with "#" or ";", that a comment can follow an address on the same line or take the whole line, and that lines can start with white space for formatting. This example file contains both IPv4 and IPv6 addresses for illustration purposes.
Compile-time address table objects are supported because addresses are read by the compiler, which then generates normal script commands. Run-time address table objects require special support from the target firewall. Currently run-time address table objects can be used in rules for iptables firewalls.
Let's look at the firewall script generated by FirewallFabrik for iptables when the Address Table object used in the policy rule is configured first as "Compile Time" and then as "Run Time". The rule is very simple and looks like (Figure 5.62):

This rule, with the object set to Compile Time, generates the following output:
# Rule 0 (global)
#
$IPTABLES -A INPUT  -d 192.168.1.1  -j DROP
$IPTABLES -A FORWARD  -d 192.168.1.2   -j DROP
$IPTABLES -A FORWARD  -d 192.168.1.3/30  -j DROP
$IPTABLES -A FORWARD  -d 192.168.2.128/25  -j DROP
$IPTABLES -A FORWARD  -d 192.168.1.200  -j DROP
$IPTABLES -A FORWARD  -d 192.168.1.201  -j DROP
The compiler replaced the object address_table_1 in the Destination with addresses it took from the file. Option assume firewall is part of any was turned off in the firewall object settings, which is why compiler did not generate rules in the OUTPUT chain. However, one of the addresses in the file matched the address of one of the interfaces of the firewall (192.168.1.1) and the corresponding rule went into the INPUT chain. Other addresses were copied from the file verbatim, including netmask specifications. The policy object of this firewall was configured as "IPv4 rule set", because of this the compiler dropped the IPv6 addresses it found in the file. If the rule set was configured as a mix of IPv4 and IPv6, compiler would use IPv4 addresses in IPv4 rules and IPv6 addresses in IPv6 rules.
Now let's switch the address table object to "Run Time". The generated iptables script:
# Using 1 address table files
check_file "address_table_1" "/home/vadim/addr-table-1.tbl"

# Rule 0 (global)
#
grep -Ev '^#|^;|^\s*$' /home/vadim/addr-table-1.tbl | while read L ; do
  set $L; at_address_table_1=$1; $IPTABLES -A FORWARD  -d $at_address_table_1  -j DROP
done
First, the generated script checks if the file specified in the address table object exists on the firewall machine. If the file is not found, the script aborts execution to avoid loading incomplete iptables rules. However, the script cannot verify that the file is the one you intended it to be; it just assumes that if the file with this name exists it is the right one and tries to interpret it as a list of IP addresses, with one address per line. Then the script reads the file line by line, skipping comments, and assigns IP addresses to the shell variable at_address_table_1, which it then uses in the iptables command.
Since the compiler did not see the addresses from the file, it could not detect that one of them matched an address of the firewall and all iptables commands went to the FORWARD chain. The file /home/vadim/addr-table-1.tbl should be located on the firewall where the generated iptables script will be executed so the script can find it.
Here is what you get if the option "Assume firewall is part of any" is turned on in the firewall object settings:
# Rule 0 (global)
#
grep -Ev '^#|^;|^\s*$' /home/vadim/addr-table-1.tbl | while read L ; do
  set $L; at_address_table_1=$1; $IPTABLES -A OUTPUT  -d $at_address_table_1  -j DROP
done
grep -Ev '^#|^;|^\s*$' /home/vadim/addr-table-1.tbl | while read L ; do
  set $L; at_address_table_1=$1; $IPTABLES -A FORWARD  -d $at_address_table_1  -j DROP
done
The difference is that compiler generated two sets of commands, one in chain OUTPUT and another in chain FORWARD. The original rule has "any" in source, and if the option Assume firewall is part of any is turned on, the compiler assumes the source of the rule can have either an unknown address or the firewall. The former makes it generate iptables command in the FORWARD chain and the latter makes it generate iptables command in the OUTPUT chain. This logic is not specific to the address table object type; the compiler does this regardless of the type of the object used in destination if source is "any" and option Assume firewall is part of any is turned on.
Using Address Tables with iptables IP Sets
FirewallFabrik supports using the netfilter ipset module with iptables firewalls. The ipset module provides a method for storing a list of IP addresses or IP subnets in memory. This allows firewall administrators to define a single iptables rule that matches multiple IP addresses or IP subnets as the source and/or destination. In FirewallFabrik an "ipset" is associated with an address table object where the list of addresses and subnets are defined in a file.
Using the IP sets feature requires the ipset package to be installed on the target firewall. On RHEL 8+ and derivatives, install it with dnf install ipset. On Debian/Ubuntu, use apt install ipset.
You can find more information about the netfilter ipset module at the netfilter IP sets page.
[!NOTE] Testing if your iptables firewall supports IP set
To test if your firewall has the ipset module and ipset tools installed run the following commands from a shell. Note you must be root or have sudo rights to run the command.
Test to check if ipset tools are installed
bash
fwadmin@guardian:~$ sudo ipset --version
ipset v2.5.0 Protocol version 2.
fwadmin@guardian:~$
Test to check if ipset module is installed
bash
fwadmin@guardian:~$ sudo ipset -N test iphash
FATAL: Module ip_set not found.
ipset v4.1: Couldn't verify kernel module version!
fwadmin@guardian:~$
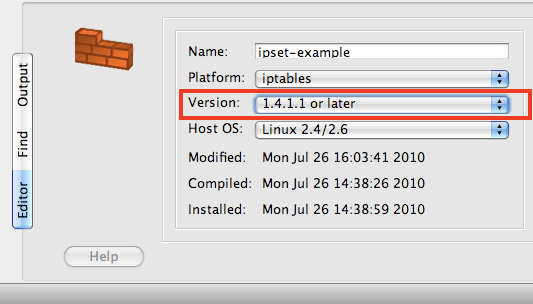
To enable the iptables "IP sets" functionality in FirewallFabrik, you must explicitly set the version of the iptables firewall that you want to use with the ipset module. Navigate to the firewall and double-click to open the object in the editor window. Set the iptables version number to a version that is at least 1.4.1.1.
After you have set the iptables version number, click Firewall Settings for this firewall. Near the bottom of the Firewall Settings dialog window you there is a checkbox that says:
Use module "set" for run-time address table objects. (This module is only available in iptables v 1.4.1.1 and later.)
Select this checkbox to enable using the iptables ipset module.
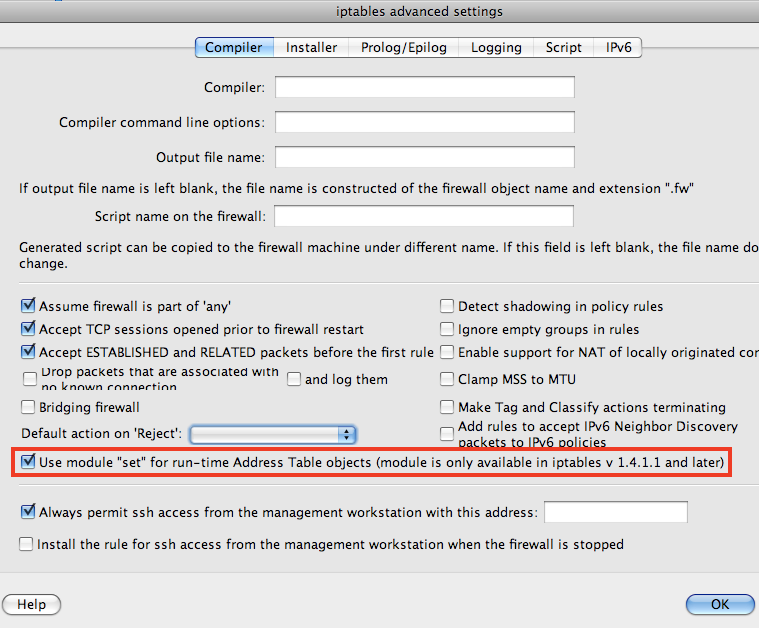
If the checkbox and text are shown as greyed out, then go back and check that you set the iptables version number for this firewall.
You can only use address tables that are set to Run Time with the ipset module. Compile Time address table objects will behave as before with the objects in the specified file being expanded when the firewall is compiled.
[!NOTE] Mixed IP addresses and IP Subnets in IP Sets
Normally the ipset module requires you to create separate "sets" for IP addresses and IP subnets. FirewallFabrik, through its abstraction layer, enables you to create mixed IP addresses and IP subnets in the same file. This creates what is known as a "set list" that contains two "sets", one "set" that includes only IP addresses and another "set" that includes only IP subnets.
The following example shows the FirewallFabrik configuration steps for setting up an Address Table called "bad_hosts", using that address table in a rule, and confirming the ipset configuration.

You can use the ipset tools to view the configuration of your "sets" once they have been created by FirewallFabrik on your firewall. For example, the command ipset --list will list all the configured "sets" on your firewall.
If you install a firewall that is using address tables with ipset enabled you can update the list of addresses that are stored in memory for that "set" by updating the file associated with the address table object and then running the firewallscript.fw reload_address_table command. For the examples shown above you would enter:
guardian.fw reload_address_table bad_hosts /etc/bad_hosts
where "guardian.fw" matches the name of your FirewallFabrik script file and "bad_hosts" is your address table object. This dynamically updates the list of addresses stored in memory for the bad_hosts set while iptables is running.
[!NOTE] Naming Convention for Address Table Objects and Sets
When FirewallFabrik creates the "set" it substitutes an underscore ("_") for any spaces. For example, the address table named "My Address List" would have a "set" name of "My_Address_List". Also, note that the name of the address table object cannot start with colon (":") due to restrictions in the ipset module.
There are two primary benefits of using the ipset module. First, the performance for matching a single rule that is using a set to hold a large number of addresses is better than having individual rules for each of these addresses. Second, the ipset module and tools provide a way to dynamically update the addresses in a list while the firewall is still running.
Special-Case Addresses
Policy compilers treat some addresses in policy rules in special ways. For example, the compiler for iptables checks if the address found in "Destination" or "Source" of a rule matches the address of any interface of the firewall to determine if the rule should be placed in the INPUT or OUTPUT chain.
Broadcast and Multicast Addresses, iptables Firewall
Two important special cases are broadcast and multicast addresses. It is important to place rules in the correct chain in generated iptables script, because even though these addresses are not equal to those of the firewall's interfaces, iptables processes packets with broadcast or multicast destination in the INPUT chain. FirewallFabrik is aware of this and generates the correct iptables commands.
In order to match broadcast or multicast addresses in the rules, we need to create objects to describe them. The choice of object type to describe broadcast or multicast address depends on whether this is just a single address, a range or a block. An address object is good for defining a single address, address range is good for sets of consecutive addresses and network object is good for describing a block. For example, you can use an address object with address "255.255.255.255" to describe a broadcast. address range with addresses "224.0.0.5 - 224.0.0.6" would work well to describe two multicast groups used by OSPF. A network object with address "224.0.0.0" and netmask "240.0.0.0" can be used to describe a whole multicast address block.
Here are few examples:
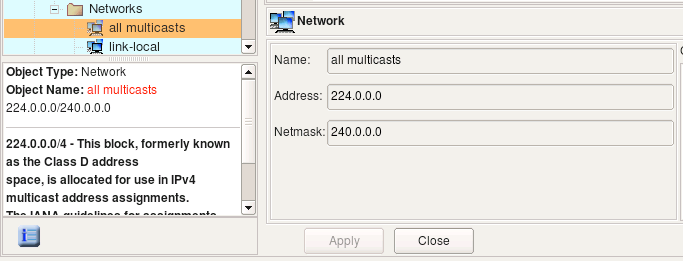
Object "all multicasts" is part of the Standard Objects library that comes with the program. It describes an entire address block allocated for multicasts. Consider a simple policy rule that permits all multicasts:

For iptables, this rule translates into the following script:
$IPTABLES -A INPUT -d 224.0.0.0/4 -m state --state NEW -j ACCEPT
The rule went into the INPUT chain because iptables processes multicast there.
Here is another example, this time it involves broadcast addresses. The interface "inside" of the test firewall has address 172.16.22.1 with netmask 255.255.255.0. This defines subnet 172.16.22.0/255.255.255.0 with broadcast address 172.16.22.255. We create an address object with the name "net-172.16.22 broadcast" and address "172.16.22.255" and use it in the destination field of a policy rule. Another rule in the same example will match broadcast address "255.255.255.255"; an address range object that defines this address is present in the standard objects library under the name "broadcast". Here are the rules:

These two rules translate into the following script for iptables:
# Rule 0 (global)
#
$IPTABLES -A INPUT  -d 255.255.255.255  -m state --state NEW  -j ACCEPT
#
# Rule 1 (global)
#
$IPTABLES -A INPUT  -d 172.16.22.255  -m state --state NEW  -j ACCEPT
Both rules went into INPUT chain as expected.
Broadcast and Multicast Addresses, Bridging iptables Firewall
Compilers treat broadcast and multicast addresses differently if the firewall object is set to be a bridging firewall. In this case the checkbox "Bridging firewall" should be turned on in the firewall settings dialog and one or more interface objects should be marked as "Bridge port":
Now the rule that matches the broadcast destination address will be treated differently:

This produces the following iptables commands:
$IPTABLES -A FORWARD  -d 172.16.22.255  -m state --state NEW  -j ACCEPT
$IPTABLES -A INPUT  -d 172.16.22.255  -m state --state NEW  -j ACCEPT
Rules went into both INPUT and FORWARD chains because the bridging firewall passes broadcasts through, but at the same time accepts them as packets headed for itself. Since the rule did not specify which interface it should look at, FirewallFabrik assumed that the generated rule should inspect packets crossing all interfaces, both bridge ports and "normal" ones, and therefore placed the rule in both INPUT and FORWARD chains.
DNS Name Objects
A DNS Name object represents a DNS "A" or "AAAA" record. The object resolves into IP address at compile or run time. The address (IPv4 or IPv6) the object resolves to depends the address family or families of the rule set it is used in. That is, if the object is used in a rule that is part of IPv4 rule set, the compiler will try to resolve the object using DNS query for the "A" record, but if the object is used in a rule that is part of an IPv6 rule set, the compiler will run a "AAAA" query. If the rule set where the object is used is a mixed type (IPv4+IPv6), the compiler will resolve the same object twice using different queries.
The DNS Name object dialog looks like this:
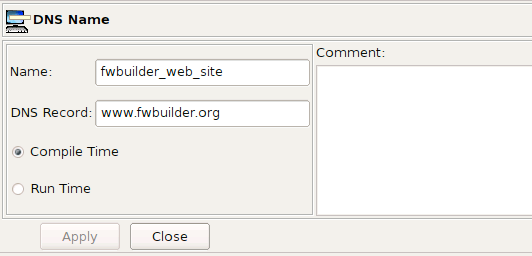
- Name:
The name of the DNS Name object
- DNS Record:
The DNS record you want to resolve.
- Compile Time / Run Time:
Indicate whether you want to resolve the IP address when you create the firewall script (compile time) or when you run the script on the firewall (run time).
- Comment:
A free-form text field used for comments
The DNS Record parameter is the name of the A or AAAA record we want to resolve. In this example, it is the host name of the FirewallFabrik project web site "www.FirewallFabrik.org". Note that IPv6 web server for the project is accessible as "ipv6.FirewallFabrik.org" so we are going to need second DNS name object for IPv6 examples. Compile Time and Run Time options have the same meaning as those in the address table object, that is, a compile-time DNS name object is converted to the IP address by the policy compiler, while a run-time DNS name object is not. In the latter case, the compiler puts the DNS record name into the generated script or configuration file and leaves it up to the firewall to resolve it when the script is activated.
Both compile-time and run-time DNS name objects are supported on all target firewall platforms.
Let's look at how the simple rule shown in Figure 5.89 compiles for iptables, both for compile-time and run-time DNS name objects.

# Rule 0 (global)
#
$IPTABLES -A FORWARD  -d 70.85.175.170  -m state --state NEW  -j ACCEPT
In this trivial case, the compiler simply resolved "www.FirewallFabrik.org" to an IP address and used it in the iptables command. However, if the policy rule was in a rule set configured as an IPv6-only rule set, the rule would not produce any iptables command at all because there is no AAAA DNS record with name "www.FirewallFabrik.org". If the rule set was both IPv4+IPv6, then the rule would generate iptables command only in the IPv4 part. The opposite is also true: the DNS name object with record "ipv6.FirewallFabrik.org" will only produce iptables commands when used in IPv6 rule set because there is only an AAAA record with this name.
Now let's see the same with a run-time DNS name object:
# Rule 0 (global)
#
$IPTABLES -A FORWARD  -d www.FirewallFabrik.org -m state --state NEW  -j ACCEPT
Here the compiler used the line entered in the DNS record parameter literally, leaving it up to iptables on the firewall machine to resolve this name into an IP address. Using a run time DNS name object in IPv6 policy generates the following iptables command:
# Rule 0 (global)
#
$IP6TABLES -A FORWARD  -d ipv6.FirewallFabrik.org -m state --state NEW  -j ACCEPT
\$IP6TABLES is the shell variable defined at the beginning of the generated script; the value of this variable is the full path to the ip6tables command line utility. ip6tables will try to resolve given name to an IPv6 address since it processes IPv6 iptables policy.
Object Groups
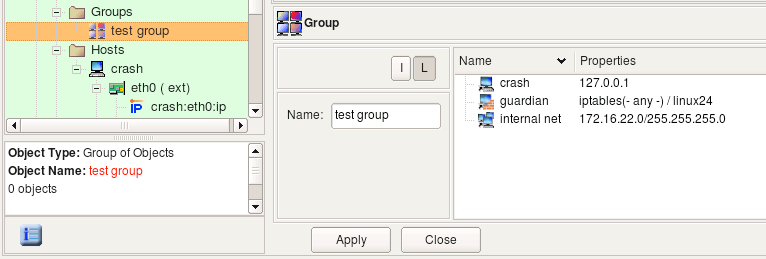
The group of objects holds references to hosts, networks, address ranges, firewalls and other groups of addressable objects (Figure 5.89). Use the New Object / New Object Group option to create a new group. Objects can be added to the group using the following methods:
- Using drag and drop:
Objects can be dragged from the tree into the group dialog. Click, hold down the mouse button, and drag the object to add it to the group.
- Using the popup menu:
You can use copy and paste operations between the tree and group dialog. Right-clicking the object in the tree opens a pop-up menu. Choose Copy in this menu, then move the mouse to the group dialog and right-click in the icon field. This also opens a pop-up menu, where you choose Paste. This inserts a reference to the object in the group.
- Using the Edit main menu:
Select the object in the tree, select Edit/Copy Object from the menu bar, click the group dialog, and then select Edit/Paste Object from the menu bar.
Dynamic Object Groups
Dynamic Groups allow you to define filter criteria to match objects based on their Object Type and Tags. When a Dynamic Group is used in a rule the compiler automatically expands the group to include all the objects that match the filter criteria at the time the compiler is run.
To create a Dynamic Group right-click on the Groups system folder in the object tree and select "New Dynamic Group". Figure 5.90 shows the new group in the Editor Panel with the default values set.
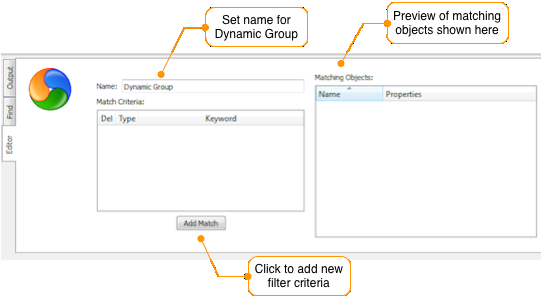
Click Add Match to create filter rules that will be used to determine which objects will be included in the Dynamic Group. Multiple filter rules can be created in a single group. The logic used between rules is "OR" where an object that matches any of the rules will be included in the group.
Within a filter rule, the logic between the Object Type and Tag fields is "AND" logic where both elements need to match in order for an object to be included in the group. For example, a filter rule with the Object Type set to Network and the Tag set to "New York" will only match Network objects that have the keyword set to New York.
Dynamic Group Example
In this example the FirewallFabrik data file includes a number of objects that have already been defined. Some of these objects have been configured with keywords like "New York" and "London" to identify the city where the element the object represents is located.
To create a rule that matches all the network objects that are associated with New York, we create a new Dynamic Group called New York Networks as shown in Figure 5.91.
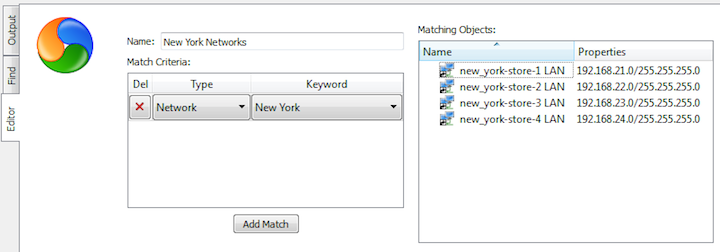
From the preview window you can see that there are four networks that have Tags that include New York (remember that an object can have more than one Tag defined).
Figure 5.92 shows a rule that includes the Dynamic Group object in the Source column of the rule.

Running a single rule compile, shown in Section 10.2, for this rule will result in all the objects that match the current filter rules in the "New York Networks" Dynamic Group getting expanded to match the four network elements that have Tags that include New York. The single rule compile output is shown in Figure 5.93.
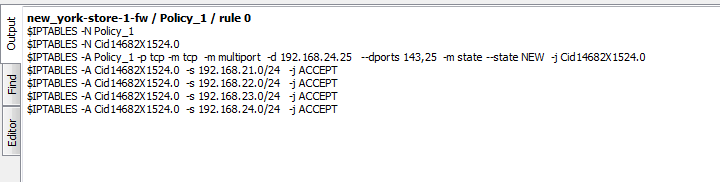
Adding a new filter rule to the "New York Networks" Dynamic Group to include any Address Ranges that include the Tag of New York will result in the group shown in Figure 5.94.
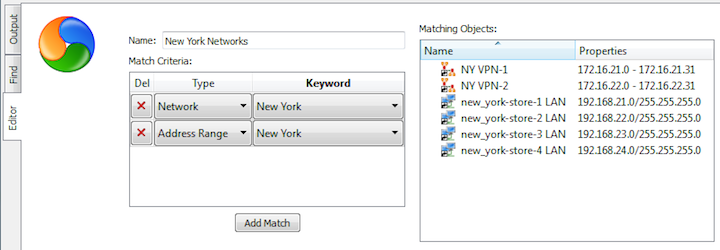
Recompiling a rule that uses the "New York Networks" Dynamic Group object will automatically detect the additional Address Ranges that include the Tag of New York. Figure 5.95 shows the updated compiler output.
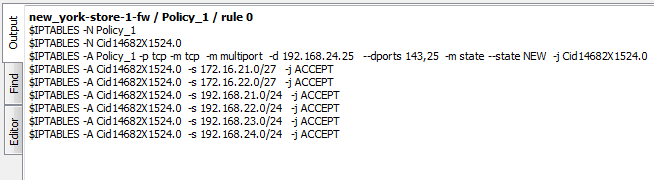
Service Objects
In FirewallFabrik, service objects represent IP, ICMP, TCP, and UDP services such as "host unreachable" in ICMP, HTTP in TCP, GRE in IP, and DNS in UDP. FirewallFabrik provides service objects for hundreds of well-known and frequently-used services in ICMP (IP protocol number 1), TCP (IP protocol number 6), and UDP (IP protocol number 17).
IP Service
The IP service object describes protocols that are not ICMP, TCP, or UDP. (ICMP, TCP, and UDP have their own service objects.) An IP protocol is defined by the 8-bit field in the IP packet header. The screenshot below represents the ESP object (Encapsulating Security Payload, part of the IPSEC protocol family) which uses the IP protocol number 50.
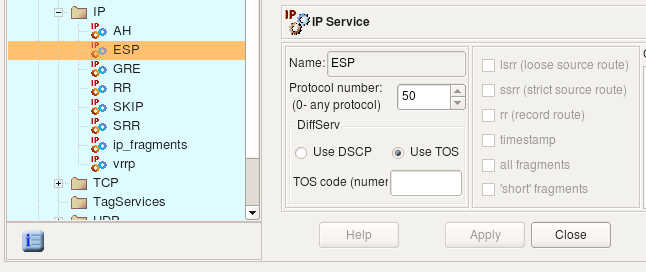
[!NOTE] Protocol numbers are assigned by IANA; you can look up the number for a particular protocol at the following URL: http://www.iana.org/assignments/protocol-numbers/
Besides the protocol number, the header of the IP packet also has a field called "Options" which is a variable-length list of optional information for the packet. Not all firewalls can examine options, and those that can usually have certain limitations as to what options they can match against. FirewallFabrik tries to provide controls for many popular options supported by the most sophisticated firewalls. Not all options supported by FirewallFabrik are supported by all target firewall platforms (Table 5.3).
| Firewall | lsrr | ssrr | rr | timestamp | all fragments | 'short' packets |
|---|---|---|---|---|---|---|
| iptables | + | + | + | + | + | - |
Table 5.3. Support for IP options and fragmentation in iptables
Source route options: LSRR, SSRR
Normally IP routing is dynamic, with each router making decisions about which next hop router to send the packet to. However, another option exists where the sender can choose the route. In the case of the Loose Source Route, the sender (host) can specify a list of routers the packet must traverse, but it may also pass through other routers between any two addresses in the list. The Strict Source Route works very much the same way, except the packet must traverse only through the specified addresses. Source routing can potentially be used to reach hosts behind the firewall even if these hosts use private IP addresses, which normally are not reachable over the Internet.
Record route option: RR
This option causes every router that handles the packet on the way to add its IP address to a list in the options field. This option is used by the ping utility when it is called with the "-R" command line switch; it can potentially be exploited to discover the internal network addressing and layout behind the firewall. Although the risk is low, some firewall administrators prefer to block packets with this option set.
Timestamp option:
This option tells routers that handle the packet to record their timestamps and sometimes addresses (like in the case of the record route option). This option is seldom used, but can potentially be exploited to gather information about the protected network, so some firewall administrators prefer to block packets with this option set.
Fragment options:
IP packets may sometimes become fragmented. This happens if the original datagram is larger than what a physical network layer can transmit. The IP packet header has special fields (called "Flags" and "Fragmentation Offset") that detect fragmented packets and help reassemble them. Many firewalls can check these bits as well. Certain combinations of flags and fragmentation offsets can never happen during normal operation but were seen to be used by attackers. FirewallFabrik provides two options for handling the most commonly used cases: the "all fragments" option matches the second and further fragments, while the "short" option is used to match packets that are too short to contain even a complete IP header.
Standard IP service objects that come with FirewallFabrik appear in the Standard tree, in the Services/IP branch.
You can create your own IP Service objects in the User library.
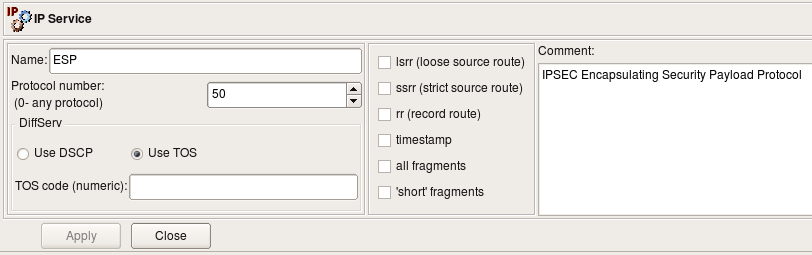
Service objects in the Standard are not editable. However, you can copy and paste a copy of a service object into the User tree and edit it there, or you can right-click the IP folder in the User tree and select New IP Service to create a service object from scratch.
In either case, the controls are the same.
The IP Service dialog provides the following controls:
- Name: This is the name of the object
- Protocol: This is the protocol number.
- DiffServ: You can specify DSCP or TOS using the radio buttons. In either case, specify a code (or class) in the field. If you do not specify a code or class, FirewallFabrik ignores the DiffServ type (DSCP or TOS).
- Options: These flags represent "Options" flags in the IP header:
- lsrr (loose source route)
- ssrr (strict source route)
- rr (record route)
- timestamp
- all fragments
- short fragments
- Comments: This is a free-style text field used for comments.
Using IP service objects in policy rules
Consider the following IP Service objects:
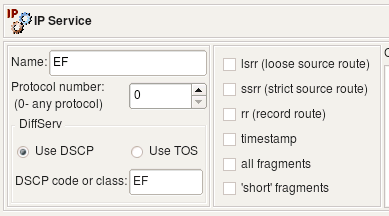
Object EF has DSCP matching turned on, matching traffic class EF. Object TOS 0x10 matches packets with TOS bits set to 0x10 (low delay). Object all_fragments has flag "all fragments" turned on, and finally object lsrr matches "loose source routing" option. Here is what we get for iptables when we use these objects in policy rules:
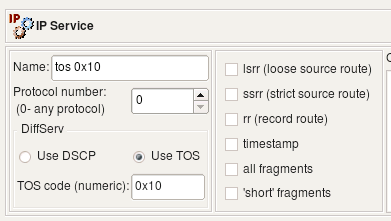
# Rule 0 (global)
#
$IPTABLES -N RULE_0
$IPTABLES -A FORWARD -p all  -f    -j RULE_0
$IPTABLES -A FORWARD -p all  -m ipv4options  --lsrr  -j RULE_0
$IPTABLES -A RULE_0  -j LOG  --log-level info --log-prefix "RULE 0 -- DENY "
$IPTABLES -A RULE_0  -j DROP
#
# Rule 1 (global)
#
$IPTABLES -A FORWARD  -o + -p all  -m dscp --dscp-class EF  -m state \
--state NEW  -j ACCEPT
$IPTABLES -A FORWARD  -o + -p all  -m tos --tos 0x10  -m state --state NEW \
-j ACCEPT
The compiler for iptables uses the ipv4options module to match lsrr, the -f command line option to match all fragments, the tos module to match TOS and the dscp module to match DSCP class.
When compiled for IPv6, these rules yield the following iptables commands:
# Rule 0 (global)
#
$IP6TABLES -N RULE_0
$IP6TABLES -A FORWARD  -m frag --fragmore  -j RULE_0
$IP6TABLES -A RULE_0  -j LOG  --log-level info --log-prefix "RULE 0 -- DENY "
$IP6TABLES -A RULE_0  -j DROP
#
# Rule 1 (global)
#
$IP6TABLES -A FORWARD  -o +  -m dscp --dscp-class EF  -m state --state NEW  -j ACCEPT
$IP6TABLES -A FORWARD  -o +  -m tos --tos 0x10  -m state --state NEW  -j ACCEPT
ip6tables does not have the -f command line flag; instead, it uses the frag module to match fragments. FirewallFabrik currently does not support the ip6tables ipv6header module, and source routing options do not exist in IPv6, so object "lsrr" cannot be used in rules.
ICMP and ICMP6 Service Objects
The ICMP service object is a generalized representation of the ICMP protocol. ICMP packets are often used to communicate error messages that are acted upon by either the IP layer or higher-layer protocols (TCP or UDP). ICMP can also be used as a simple query protocol.
FirewallFabrik has service objects for both IPv4 and IPv6. ICMP service objects for IPv6 are called ICMP6 service. The standard ICMP service objects that come with FirewallFabrik appear in the Standard Objects library, in the Services/ICMP branch. User-defined ICMP and ICMP6 service objects appear in the library User in the same Services/ICMP branch.
Standard service objects are not editable. However, you can copy and paste a copy of a service object into the User tree and edit it there, or you can right-click the ICMP folder in the User tree and select New ICMP Service to create a service object from scratch.
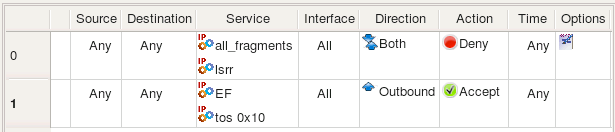
As a firewall administrator, you need to understand the nature and purpose of ICMP in order to properly configure the firewall to block unwanted ICMP messages while permitting useful ones.
ICMP packets have two header fields that distinguish particular ICMP messages: the type and code fields. There are many different types and classes of ICMP messages. See http://www.iana.org/assignments/icmp-parameters for IPv4 types and classes and http://www.iana.org/assignments/icmpv6-parameters for IPv6 types and classes.
Any combination of the type and code values is allowed in the ICMP or ICMP6 object. For example, the following two screen shots illustrate definitions of ICMP and ICMP6 objects for the request packet of the well-known ping protocol. The type codes are different for IPv4 and IPv6 variants, although the code is equal to 0 in both:


Both ICMP and ICMP6 allow value "any" in type or code fields. For example, this can be used to build an object to match a family of ICMP messages with the same type but any code:
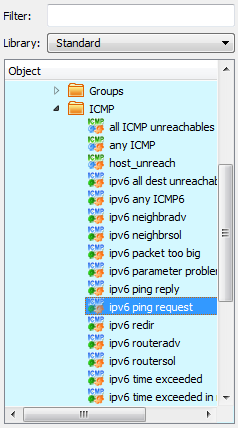
Both IPv4 and IPv6 ICMP service dialogs provide the following controls:
- Name: This is the name of the object.
- ICMP Type and Code:
- Type: The ICMP message type. This control consists of a numeric selector that lets you specify the message type. To specify "any" type, set the control to any.
- Code: The ICMP message code. This control consists of a numeric selector that lets you specify the message code. To specify "any" code, set the control to any.
- Comment: This is a free-style text field used for comments.
Using ICMP and ICMP6 Service Objects in Rules
Consider the following rule where we use two ICMP objects, one for IPv4 and another for IPv6:
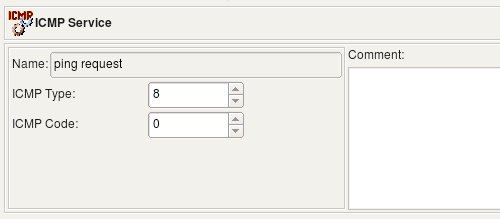
If the rule set this rule belongs to is configured as combined IPv4 and IPv6, then policy compiler will pick the ICMP service that matches address family on each separate pass, one for IPv4 and then for IPv6. Here is what we get for iptables:
# --------------- IPv4

# Rule 0 (global)
#
$IPTABLES -A FORWARD  -i + -p icmp  -m icmp  --icmp-type 8/0 \
    -m state --state NEW  -j ACCEPT

# --------------- IPv6

# Rule 0 (global)
#
$IP6TABLES -A FORWARD  -i + -p ipv6-icmp  -m icmp6 --icmpv6-type 128/0 \
    -m state --state NEW  -j ACCEPT
TCP Service
The TCP service object is a generalization of the TCP protocol, which provides a connection-oriented reliable byte-stream service. Many well-known, frequently-used application protocols use the TCP protocol: FTP (File Transfer Protocol), SMTP (Simple Mail Transfer Protocol), HTTP (Hyper Text Transfer Protocol), and so on. The TCP header contains special fields indicating source and destination port numbers that are used to identify the sending and receiving application. These two values, along with the source and destination IP addresses in the IP header, uniquely identify each connection.
Since port numbers are used to distinguish applications using the data stream provided by the TCP protocol, each application should use a unique port number. To ensure interoperability, these numbers must be assigned by a central authority in a coordinated manner. Internet Assigned Numbers Authority (IANA) does just that. Assigned TCP and UDP port numbers can be looked up at http://www.iana.org/assignments/port-numbers. Most Unix systems also come with a /etc/services file that contains a list of assigned port numbers.
FirewallFabrik comes with a collection of predefined TCP Service objects with port numbers already configured. You can simply use these objects in your policy rules, so you do not have to look up port numbers every time you need them. These objects are part of the Standard Objects library and are located in the Services / TCP branch.
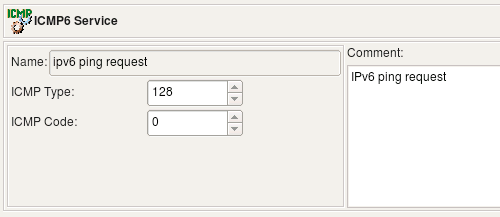
The typical TCP Service object is represented in the following screenshot:
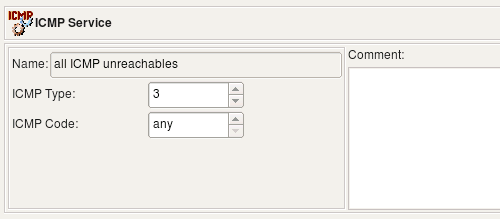
In FirewallFabrik, the TCP service object is a generalization of TCP protocol. The TCP header of a packet carries only one fixed value for the source port and one fixed value for the destination port. The TCP Service object allows a range of values to be used for the source and destination ports. This allows a single TCP Service object to describe either a family of protocols using consecutive port numbers, or a protocol that may use variable port numbers or simply many protocols that use port numbers from a certain range. For example, on Unix systems, TCP sessions opened by a privileged process always have their source port number assigned from a range below 1024, while unprivileged processes use source port numbers from a range starting from 1024 and above. The TCP Service object with a source port range defined as shown in the following screenshot describes all privileged TCP sessions.

Using "0" as both start and end values for a range means "any value" for that range. The source port range of the "privileged TCP" object starts from 0 and ends at 1023 (port ranges are inclusive in FirewallFabrik), while its destination port range's start and end are both set to zero, which means "any destination port". This object describes any TCP protocol with a source port in range 0-1023 and any destination port.
If all you need is to create an object to describe the TCP protocol with a particular destination port, just use the same port number for both the start and end of a destination port range (which effectively creates a range that consists of a single value).
The TCP header also contains a collection of one-bit fields, or flags, that carry a variety of control information. For example, the SYN and ACK flags are used for connection establishment and the FIN flag is used for connection termination. Certain combinations of flags are not allowed during the normal protocol operation and may cause unpredicted reactions in some systems; because of this, the firewall administrator may want to block TCP packets with an unwanted combination of flags.
There are six flags in the TCP header. We just briefly mention them here; more information can be found in TCP/IP Illustrated, vol 1 by W. Richard Stevens, chapter 17.
| Flag | Description |
|---|---|
| U (URG) | The "urgent" pointer is valid |
| A (ACK) | The acknowledgment number is valid |
| P (PSH) | The receiver should pass this data to the application as soon as possible |
| R (RST) | Reset the connection |
| S (SYN) | Synchronize sequence numbers to initiate a connection. |
| F (FIN) | The sender is finished sending data. |
TCP Flags
"Established" is not a TCP flag. Instead, checking this box causes the firewall to match any packet in an established session. Checking this checkbox disables the other TCP flag controls.
FirewallFabrik supports all six flags. The iptables compiler can match any combination of TCP flags.
Usually the firewall cannot only match a combination of flags, but can also examine only a given subset of TCP flags. FirewallFabrik provides two sets of checkboxes for TCP flags and flag masks (see screenshot below). Checkboxes in the first row control TCP flags that we want the firewall to examine and checkboxes in the second row tell it whether they should be set or cleared. Only flags whose checkboxes in the first row are set will be looked at by the firewall. (If you check a box in the bottom row while leaving the checkbox above it unchecked, the flag will be ignored.)
The object in the screenshot matches a TCP packet with any combination of port numbers, the TCP flag SYN set, and all other flags cleared. The firewall will examine all TCP flags.
A combination of flags and a mask can be used in a rule that looks for some flags to be set or unset and ignores other ones, regardless of their state. For example, we can create a rule that detects a so-called "null scan" which is done using TCP packets with all flags cleared. For this rule, we create a TCP service object "tcp null scan" where all flag masks are set but all TCP flags are cleared. This means we examine all flags but only match them if they are all cleared. This object is represented in the following screenshot:
TCP Service dialog provides the following controls:
- Name: This is the name of the object
- Source port range: These two controls define the start and end of the source port range. They accept values 0 through 65535.
- Destination port range: These two controls define the start and end of the destination port range. They accept values 0 through 65535.
- TCP Flags: TCP flags and masks, see above. The Established checkbox causes the firewall to match packets in established sessions. Selecting this checkbox disables the other TCP flag controls.
- Comments: This is a free-style text field used for comments.
Using TCP Service in rules
Single destination TCP port
Let's start with an example using simple TCP service that describes the HTTP protocol. Both the beginning and the end of the source port range in this service object are set to "0," which means the program will leave these out when it generates target firewall configuration. The destination port range is defined as "80-80" which means the object describes just single destination tcp port "80". All flag checkboxes are unchecked, which means no flag-matching configuration will be generated.
Now we put this object in the "Service" element of a rule as shown on the next screenshot. To make this trivial example just a little bit more interesting, we configured the policy rule set as "Combined IPv4 and IPv6" and put two address objects in destination, one is IPv4 address and another is IPv6 address.
This rule compiles into the following for iptables:
# --------------- IPv4

# Rule 0 (global)
#
$IPTABLES -A FORWARD -p tcp -m tcp  -d 70.85.175.170 \
     --dport 80  -m state --state NEW  -j ACCEPT

# --------------- IPv4

# Rule 0 (global)
#
$IP6TABLES -A FORWARD -p tcp -m tcp  -d 2001:470:1f0e:162::2 \
     --dport 80  -m state --state NEW  -j ACCEPT
Source port range
In the next example, we look at the TCP service object that defines a specific source port range to match source ports greater than or equal to 1024:
Using this object in a rule as follows:
To make the rule slightly more realistic, we made it stateless using its options dialog (double-click in the column "Options" of this rule and check checkbox "Stateless" in the first tab of the dialog). Let's see what the program generates when this rule is compiled for iptables:
# Rule 0 (global)
#
$IPTABLES -A FORWARD  -i + -p tcp -m tcp  --sport 1024:65535  -j ACCEPT
Established
Stateful firewalls such as iptables offer a much better way to track and match reply packets because they can follow the states a TCP session goes through when it is opened, data is transferred, and finally the session is closed. An attempt to use a TCP service object with the "Established" flag set in rules for iptables causes an error, because iptables supports stateful inspection natively and should be used instead.
Here is an example of the TCP service object with flag "Established" set and source port range "80-80", that is, this object describes TCP packets coming from the web server operating on the standard port 80 back to the client.
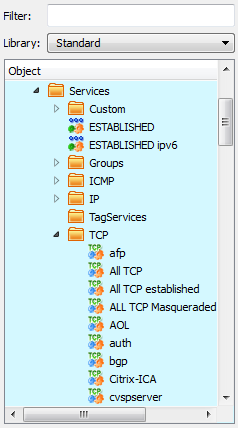
Using this object in a rule:
UDP Service
The UDP service object is a generalization of the UDP protocol, which is a connectionless transport layer protocol. Many well-known applications use UDP as their transport, such as DNS (Domain Name System), DHCP (Dynamic Host Configuration Protocol), NTP (Network Time Protocol), and SNMP (Simple Network Management Protocol).
As in TCP, UDP uses port numbers to distinguish applications from one another. The UDP packet header carries two port numbers: the source port and the destination port. The UDP service object in FirewallFabrik allows for a definition of ranges for both the source and the destination ports. The meaning of values assigned to the start and end of the range is the same as in the TCP service object: ranges are inclusive, that is, both start and end ports of the range are included. Using "0" for both the start and end of the range means "any port". These rules work for both the source and destination ranges. The following screenshot shows the "dns" UDP Service object that represents the Domain Name System protocol, which uses destination port 53.
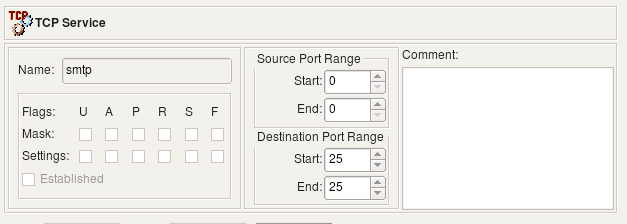
Objects in the Standard set of service objects are not editable. However, you can copy and paste a copy of a service object into the User tree and edit it there, or you can right-click the UDP folder in the User tree and select New UDP Service to create a service object from scratch.
The UDP Service dialog provides the following controls:
- Name: This is the name of the object
- The Source port range: These two controls define the start and the end of the source port range. They accept values 0 through 65535.
- The Destination port range: These two controls define the start and the end of the destination port range. They accept values 0 through 65535.
- Comments: This is a free-style text field used for comments.
Using UDP Service in Rules
Single Destination UDP port
In this example we'll use the UDP service object "domain" shown on screenshot above. The rule looks like this:
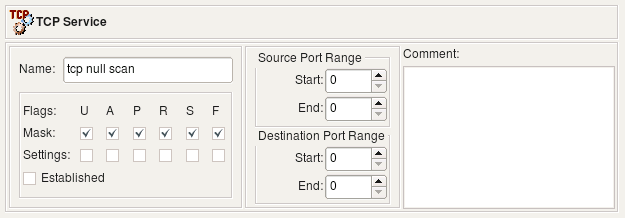
Here is iptables command generated for this rule:
# Rule 0 (global)
#
$IPTABLES -A FORWARD  -i + -p udp -m udp  --dport 53  -m state --state NEW  -j ACCEPT
This rule got a "-i +" clause because direction was set to Inbound but "Interface" column was left empty. To enforce inbound direction compiler uses "-i" option but since interface was not specified, the rule got attached to all interfaces which is defined by the +.
Source Port Range
The following UDP service object defines source port range of the ports with values greater than or equal to 1024:
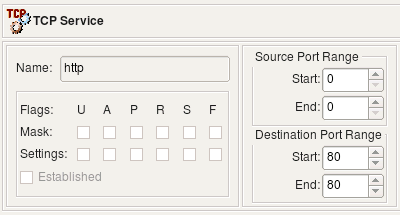
Using this object in policy rule yields the following code for iptables:
# Rule 0 (global)
#
$IPTABLES -A FORWARD  -i + -p udp -m udp  --sport 1024:65535  -m state \
--state NEW  -j ACCEPT
User Service
User service object matches the owner of the process on the firewall that sent the packet. It translates to the "owner" match in iptables.
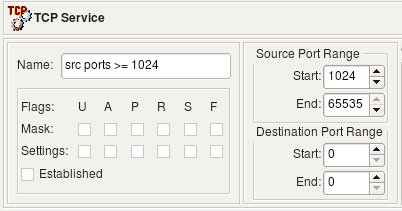
- Name: This is the name of the object
- User id: The user ID of the user account on the firewall device that the firewall should use to match packets.
- Comments: This is a free-style text field used for comments.
The user service object has only one parameter besides the name and comment: it is the user ID that the firewall should use to match packets.
The user service object is only supported for iptables.
Let's look at how the simple rule shown in Figure 5.121 compiles for iptables.

The firewall can associate a packet with a user only if the packet originated on the firewall. Packets that transit the firewall have no information about the user who owned the process that created these packets and sent them out because this process ran on an entirely different computer. For this reason, the object in the Source column must be the firewall.
Figure 5.122. User Service, iptables Compile Output
# Rule 0 (global)
#
$IPTABLES -A OUTPUT -m owner --uid-owner 500  -j DROP
The user service translated into the owner match for iptables. See the iptables man page for a more detailed explanation of this match.
The user service object is one of the simplest service object types in FirewallFabrik, but it provides the facility for basic per-user control on Linux machines. This service object can be used in rules with actions that reroute packets ("Route" action) or in the NAT rules; for example, to redirect web access via proxy.
Custom Service
The custom service object can be used to inject arbitrary code into the generated firewall script. Any combination of options allowed in the target firewall command line language that does not fit into a strict model of standard service object types can be expressed using the custom service object. For example, iptables comes with a collection of modules that adds an ability to match complex combinations of packet parameters or header fields that are not supported by a standard code. One of the modules adds the ability to match any string in the packet's payload which can be quite useful to quickly build firewall rule to block some new protocol that uses non-specific combination of ports and other parameters. This ability is sometimes used to write rules to block network trojans or viruses with known signatures.
The following screenshot represents a custom service object that uses the capabilities of the string module. Command-line options specific for this module are in the "Code String" field.
[!NOTE] The code specified in the custom service object is used literally; no validation is done either by the FirewallFabrik GUI or the policy compilers.
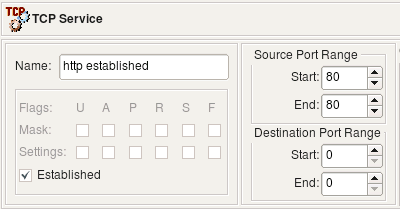
The Custom Service dialog provides the following controls:
- Name: This is the name of the object.
- Platform: This is a pull-down menu that shows a list of all firewall platform targets available in FirewallFabrik.
- Code String: This is a line of code in the target firewall language. (This is the heart of the custom service object.)
- Protocol Name: Use this option if you want to restrict the custom service object to a particular protocol: TCP, UDP, or ICMP. Default is "any". For example, if this field is set to "tcp", then policy compiler for iptables generates command with parameter "-p tcp" and then inserts code defined in the "Code String" field of the custom service object.
- Address Family: Specify IPv4 or IPv6. Policy compilers use information about address family to properly use the object while compiling IPv4 or IPv6 rule sets.
- Comments: This is a free-style text field used for comments.
Using Custom Service Object in Rules
The following example uses iptables module "recent". Quoting from the iptables manual, this module "allows you to dynamically create a list of IP addresses and then match against that list in a few different ways". We can use this module to throttle brute-force ssh scanning attacks where an attacker repeatedly connects to the ssh daemon trying to guess login name and password. The full explanation of how to use the custom service object in combination with swatch script on Linux to stop these attacks can be found in the FirewallFabrik Cookbook (Chapter 14). Here we focus only on the Custom Service object and iptables rules that can be obtained with it.

The code string defined in this object is "--dport 22 -m recent --set". This matches port 22 (ssh), activates the module and adds source address of the packet to the default list maintained by the module.
The second custom service object also matches port 22 and checks if the address is already on the list and was seen during the past one minute twice:
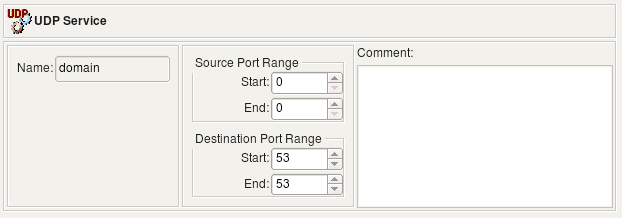
Note that our goal is to match protocol SSH (tcp port 22) and at the same time activate iptables module "recent" and add some parameters for it. Both are done by means of a service object in FirewallFabrik; however placing two service objects in the "Service" field of a rule joins them by a logical OR operation. That is, if we were to put TCP service object "ssh" and custom service object that defines parameter for module "recent" in the "Service" field of the same rule, we would end up with two iptables commands, one matching tcp port 22 and another trying to use module "recent". Since we need to match both in the same rule, we have to add "--dport 22" to the code defined in the custom service object.
Now, the rules using these objects:

Here are the iptables commands generated for these two rules:
# Rule 0 (global)
#
$IPTABLES -N In_RULE_0
$IPTABLES -A INPUT  -i + -p tcp -m tcp   --dport 22 \
    -m recent --rcheck --seconds 60 --hitcount 2  -j In_RULE_0
$IPTABLES -A In_RULE_0   -j LOG  --log-level info --log-prefix "RULE 0 -- DENY "
$IPTABLES -A In_RULE_0   -j DROP
#
# Rule 1 (global)
#
$IPTABLES -A INPUT  -i + -p tcp -m tcp  --dport 22 -m recent --set \
     -m state --state NEW  -j ACCEPT
#
First, we match port 22 and check if we have seen this source address during the past minute at least 2 times. If yes, module "recent" returns a match and the packet matches the first iptables rule. Iptables passes control to the rules in chain "In_RULE_0" where the packet is logged and dropped. If the packet does not match the conditions set for the module "recent", it does not match the first iptables rule and will be inspected by the next one (generated for the original rule #1). If this is the opening packet of a new session, it matches state "NEW" and will be permitted. Since module "recent" was also called in this rule, the source address of the packet was added to the internal table of the module "recent" so it can be used in the previous iptables rule.
The custom service object allows you to inject arbitrary strings into the generated firewall configuration in the place where port matching normally occurs. Another feature in FirewallFabrik that also allows for insertion of a code in the generated code is the custom action feature. The combination of custom service with custom action provides for a very flexible system where you can compose pretty much any required configuration line if it is not otherwise supported by the standard means. Suppose instead of just dropping SSH scan connections coming to our system, we want to slow them down, thus tying up the attacker's resources. Iptables has a target just for that called TARPIT. This target is specific for iptables and does not exist on the other firewalls supported by FirewallFabrik and there is no standard action for it. You can use the custom action mechanism to generate an iptables command with this target. In the rule, the action in it is set to "Custom Action". Double-clicking the action in the rule opens a dialog with its parameters (if any). The custom action object has one parameter: a free-form string where you enter the code you want to appear in the generated command:
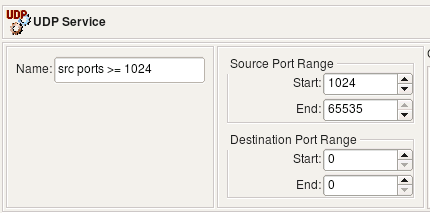
Here is what we now get when we compile this policy for iptables:
#
# Rule 0 (global)
#
$IPTABLES -N In_RULE_0
$IPTABLES -A INPUT  -i + -p tcp -m tcp   --dport 22 \
    -m recent --rcheck --seconds 60 --hitcount 2  -j In_RULE_0
$IPTABLES -A In_RULE_0   -j LOG  --log-level info --log-prefix "RULE 0 -- CUSTOM "
$IPTABLES -A In_RULE_0 -j TARPIT
#
# Rule 1 (global)
#
$IPTABLES -A INPUT  -i + -p tcp -m tcp  --dport 22 -m recent --set \
     -m state --state NEW  -j ACCEPT
#
Now the first rule ends up sending the packet to the "TARPIT" target rather than to "DROP", which is what we wanted.
Time Interval Objects
Time interval objects allow you to create a rule that only matches during certain periods of time, such as on weekend days, during work hours, or other periods. Time intervals operate based on the time as known by the firewall device.
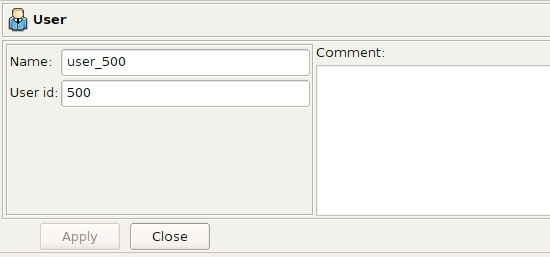
Time intervals define recurring schedules based on time-of-day and days of the week. You can combine these options to create an object that represents, for example, Tuesday afternoons from 1 to 3 PM, or weekday work hours from 9 AM to 5 PM.
- Name: This is the name of the object.
- Start time: Indicates the beginning of the daily time window when the rule is active (HH:MM, 24-hour format).
- End time: Indicates the end of the daily time window when the rule is active (HH:MM, 24-hour format). Can be earlier than the start time to define an overnight range (e.g. 22:00 to 06:00).
- Mon, Tue, Wed, Thu, Fri, Sat, Sun: Indicates on which days of the week the time interval should be applicable. For example, if Mon is checked and Tue is not, then the time interval object will apply to Mondays, but not Tuesdays.
- Comments: This is a free-style text field used for comments.
A common use case is to limit recreational activities to non-work hours.

In this rule, the "quake" protocol is allowed from the internal network after hours and during weekends. Otherwise, the final "deny all" rule in the rule set would prevent it during other times (during work hours).
Object Tags
Tags can be added to all object types and help you quickly find and organize the objects in your object tree. To set the keywords for an individual object open the object for editing and then click on the Tags button in the lower right corner of the Editor panel.
For an example of how you could use Tags, let's assume that you have two datacenters, one in New York (NY) and one in London (LON). For objects that represent items in the datacenter you could add a keyword, called "datacenter", to each of the objects. You could also add another keyword, for example "trusted" or "DMZ", to identify the security zone of the object.
Figure 5.131 shows the editor panel for an object called NY Datacenter-Net-1.
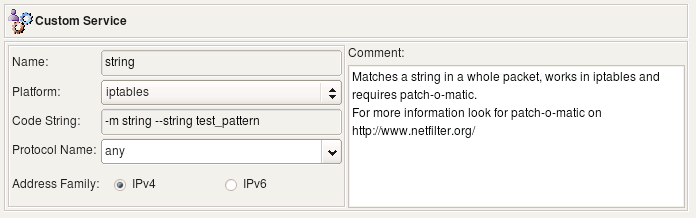
Click the Tags button to set the keywords for the active object. This will bring up the dialog window shown in Figure 5.132.
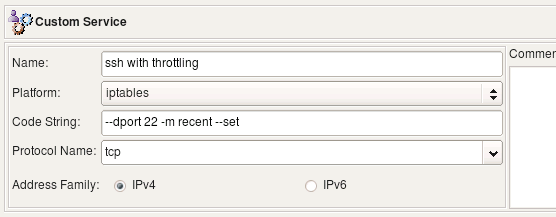
As you can see no Tags have been configured yet, so there are no existing keywords that can be assigned to the object. To create a new keyword type the name of the keyword in the text box labeled "New Tag:".
In this example we want to add the "datacenter" and "trusted" keywords to the network object. Figure 5.133 shows the dialog after the keywords have been entered. Click OK to apply the keywords to the object.
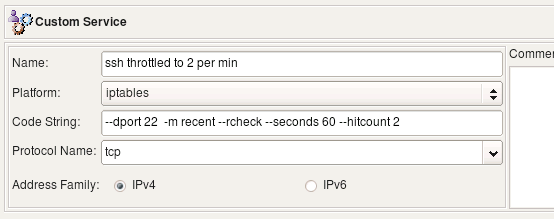
[!NOTE] After you apply keywords to an object the keywords will be displayed in the Editor panel next to the Tags button.
What if you have a lot of objects that need to have the same keywords applied? To apply a keyword to multiple objects at the same time select the objects in the tree, remember to use the CTRL or Shift keys to select more than one object, right-click on the selected objects and select Tags, then Add and then select the keyword you want to apply. Figure 5.134 shows applying the "datacenter" keyword to multiple Network objects.

You can also remove keywords from multiple objects by selecting multiple objects, right-clicking and selecting Tags -> Remove and then selecting the keyword that you want to remove.
After you have configured keywords for your objects you can type the keyword into the filter box at the top of the object tree and only the objects that match that keyword, or have an object name that matches the keyword, will be displayed.
Figure 5.135 shows the filtered view after the "datacenter" keyword has been typed into the filter box.
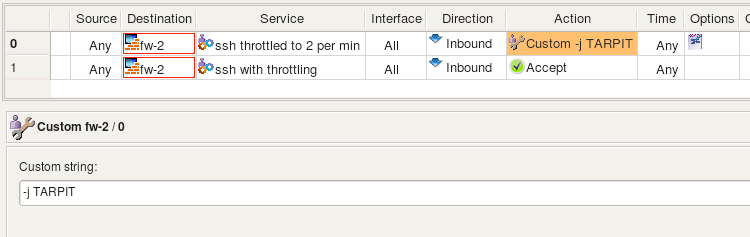
Another example is shown in Figure 5.136 where all the objects are being filtered for the "trusted" keyword. Only objects that have had the "trusted" keyword applied will be displayed. In this example only one of the two networks at each datacenter is considered trusted.
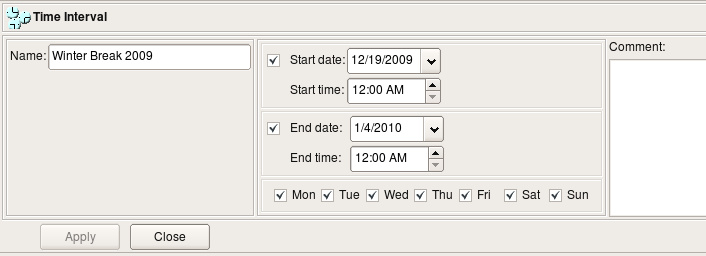
Creating and Using a User-Defined Library of Objects
The User library that comes with FirewallFabrik is all you need if you are the only person administering firewalls in your enterprise. If you have several administrators, however, each with a different workstation, then you may want to create a user library that you can distribute. That way, user-defined objects can be created once, by one person.
Let's create and distribute a simple user-defined library. Start by selecting the New Object/New Library option from the Object menu.
The library pull-down menu switches to New Library. This library is empty by default except for the standard folders.

Click the New Library icon to bring up the library dialog.
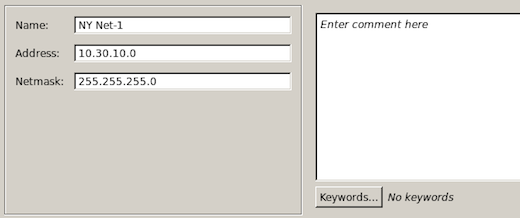
The Library dialog has three controls: Name, Color, and Comments. Enter a new name for the library in the Name field. (Here we are calling it ACME Library.) If you want, you can also specify a color for the library. This helps you easily distinguish one library from another when you are working. In this case, we have set the color to a shade of blue.

Use the normal object creation procedures to create objects in the library. Here we have created two Address objects that represent web servers, a host object with two interfaces that matches an email server and a network object to match the local LAN.
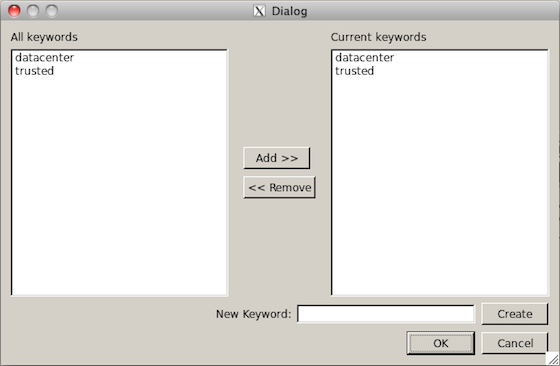
Click File/Save to save the object file.
To export the library to a file, select File/Export Library. The following dialog appears:
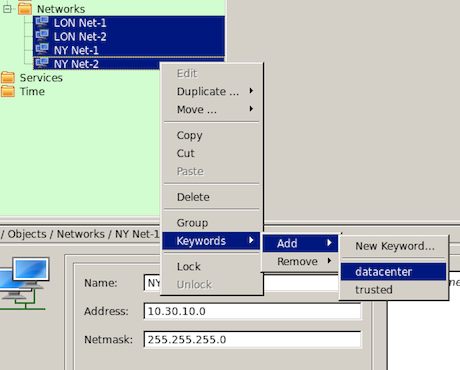
If you want to make the library read-only, leave the Make exported libraries read-only checked. Otherwise, uncheck it.
Click OK.
A file system Save dialog appears. Here you can specify a name and location for the file. Be sure the file has a .fwf file extension.
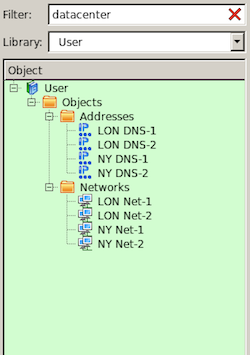
You can now move or e-mail the library to someone else.
To load a library, copy the file to the directory where you have FirewallFabrik store your object files. Then, select Import Library from the FirewallFabrik File menu. (You may have to restart FirewallFabrik to get it to locate the file. Until then, the "Import Library" option may be grayed out.)
You can now use this library like any other library. Keep in mind that changes to one copy of the user-defined library has no effect on other copies. To propagate changes, you have to redistribute the library.
Finding and Replacing Objects
Imagine you have an access policy that looks something like this:
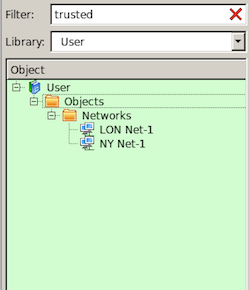
Further, imagine that you are reassigning all the IP addresses in 192.168.2.0/24 to be in the 192.168.3.0/24 subnet and that you need to modify the firewall rules to match.
One way to handle this is to manually browse through every rule in your firewall, removing the .2.0 addresses where you find them and replacing them with the equivalent .3.0 addresses. Or, you could do a Find and Replace operation.
Select Find Object from the Object menu to open the Find and Replace dialog, shown here:
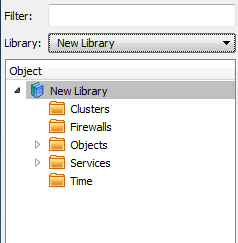
To replace every net-192.168.2.0 object with the net-192.168.3.0 object, first create the new network object. Then, drag (or Copy/Paste) a net-192.168.2.0 object into the Find object field and the net-192.168.3.0 object into the Replace object field. Then, set the Scope for search and replace pull-down menu to policy of the opened firewall, as shown here:
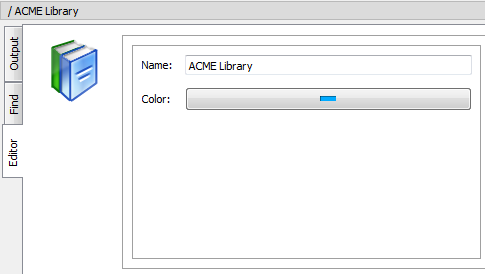
Click Replace All to replace all instances.
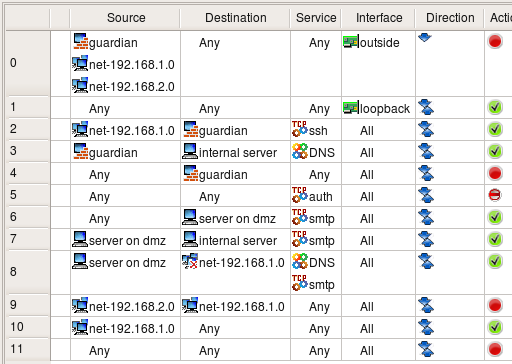
The Find object dialog has a number of controls you can use to constrain your searches:
- Object parameter pull-down menu
Allows you to specify how you search for objects. You can search by name (usable on all objects), address (usable on all addressable objects), TCP/UDP port (usable on TCP and UDP objects), Protocol Number (usable on IP service objects) and ICMP type (usable on ICMP service objects).
- Text field
The text field is populated automatically if you drag an object into the Find object field. Otherwise, you can type the text in manually.
- Use regular expressions
Checking the Use regular expressions checkbox causes the text field to be interpreted as a Perl regular expression. You can only do searches based on a regular expression. You cannot do replaces based on a regular expression.
- Search field
Drag an object into the field to find instances of that object.
- Replace field
Drag an object into the field to use it as the replacement object in a search and replace.
- Scope of search and replace
Allows you to specify whether a search or search and replace will cover just the object tree, the tree and the policies of all firewalls in the object file, just the policies in the object file, or just the current open policy.
- Buttons
The Next button finds the next instance of the object. It does not do a replace. Replace All replaces all instances of the object in the given scope. Replace replaces the current instance. Replace & Find replaces the current instance and jumps to the next one.